
Sound Recording: Accessories and Tips
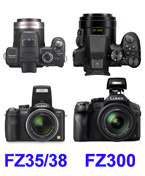
When taking video (“motion picture” in Panasonic Manuals), the FZ300 allows for three microphone alternatives, with a surprising range of settings.
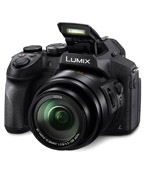
 FZ300 own Stereo Mic. For its size, the quality is surprising, allowing a decent result for all types of family and trip movies, and also for street bands and even indoors concerts. Available settings, all in Menu—[Motion Picture] are as follows:
- [Mic Level Limiter]: This is a sound compressor:
- ON: “Compressed input level”. This is the default family movie setting:
- Pros: It prevents the frequent and serious distortion caused when the sound is too loud and exceeds the input level range.
- Cons: It modifies the relationship between loud and soft sounds. May cause audible “pumping” as the input level changes following the music loudness.
- OFF: “Linear input level”. This allows you to manually (and carefully, with
some prior tests): if so select the [Mic Level Adj.] (see below) to avoid overloading distortion.
Once this is done, sound quality will be better than with the compressor.
This setting also forces the [Mic Level Disp.] to ON.
- ON: “Compressed input level”. This is the default family movie setting:
- [Mic Level Adj.]: Sound input level control, adjustable in 19 steps from - 12 dB to + 6 dB.
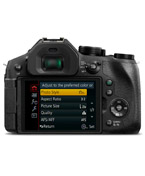
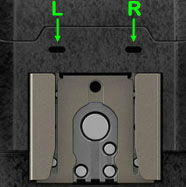
- [Mic Level Disp.]: Horizontal stereo bar onscreen, showing sound input level:
- ON: Shows onscreen an horizontal stereo input level bar.
This is the only alternative when [Mic Level Limiter] is OFF. - OFF: Does not show the bar: this is the default setting when [Mic Level Limiter] is ON.
- ON: Shows onscreen an horizontal stereo input level bar.
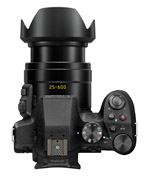
- [Zoom Mic]:
Coupled to the lens zoom action:
- ON: Telephoto: reduces stereo separation for clearer recording of far sounds in the front.
Wide-angle: records better surrounding sounds. General input level is reduced. - OFF: No effect. (Standard stereo recording).
- ON: Telephoto: reduces stereo separation for clearer recording of far sounds in the front.
- [Wind Noise Canceller]: Reduces wind noise:
- HIGH: Minimises the low-pitched sound when a strong wind is detected.
- STANDARD: Reduces the wind noise without deteriorating the sound quality.
- OFF: No effect.
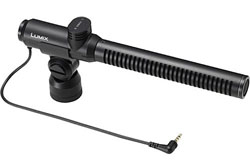 Panasonic DMW-MS2 Stereo Shotgun Mic. This unit will improve sound quality, especially when recording far-away sounds. This is a “dedicated” mic for this and similar cameras: it is mounted on the camera's “hot shoe”, with the plug connected into the camera's “[MIC] socket” (this shuts down the camera's own mics). The DMW-MS2 is quite expensive (in Europe at about €280) and user reviews are far from stellar. The bass specs are down to 80 Hz only: this will not be enough for extreme bass sounds such as large drums, double basses and 16' stops in church organs.
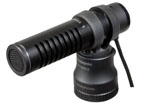 There is an alternative “dedicated” mic : the
smaller
Panasonic VW-VMS10,
There is an alternative “dedicated” mic : the
smaller
Panasonic VW-VMS10,
available at about €150.
Settings for the dedicated mics, mounted on the hot shoe, are the same as with the camera's own mics, except for the following:
- [Wind Noise Cut]: Replaces the [Wind Noise Canceller] with more options:
- HIGH: Minimises the low-pitched sound when a strong wind is detected.
- STANDARD: Reduces the wind noise without deteriorating the sound quality.
- LOW: (no specs in the Manuals).
- OFF: No effect.
- [Special Mic]: Super-directional setting:
- [STEREO] Normal stereo recording of sound over a wide area.
- [SHOTGUN] Very directional recording, shutting out background and surrounding noise.
Hi-Fi Microphones. If you are taking a video of a concert, you can record excellent hi-fi sound using
“non-dedicated” top quality mics. They can be of either the “dynamic” or the “condenser” variety. You can use either an integrated stereo mic or better two top quality monoaural mics: for the latter you need an adapter to convert their two mono plugs into the single stereo plug needed to connect to the FZ300's “[MIC] socket”. Very importantly with external mics, ensure that in the Menu—[Motion Picture], High Speed Video is turned OFF, otherwise no sound will be recorded!
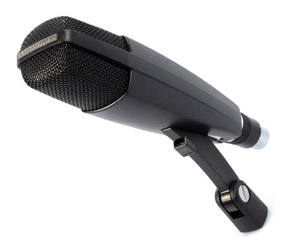 The picture shows one of my two Sennheiser MD 421-U dynamic microphones, which I bought back in Nov. 1986—exactly 30 years ago!—and are still going strong. This model has been for decades one of the very best mics for professional recording of musical instruments, and is still available, though at a hefty €400 each. Due to its unsurpassed fast transient response, it is particularly good for bowed strings, stringed keyboards and percussion.
(For top-quality recording of voices and wind instruments other models are preferred, slightly slower in transients but slightly better in flat response curve, and mostly more affordable as well). The MD 421 includes a bass attenuation filter with five settings, ranging from “M” (“Music”, with no attenuation, useful for instruments with significant low-bass contents such as keyboards, large drums, double basses, cellos and male voices) to “S” (“Speech”, with attenuation -5dB at 400Hz, -10dB at 200Hz and -14dB below 100Hz, useful for female voices and high woodwinds): the attenuation helps to eliminate unwanted background bass sounds, typically people moving around on the stage.
The picture shows one of my two Sennheiser MD 421-U dynamic microphones, which I bought back in Nov. 1986—exactly 30 years ago!—and are still going strong. This model has been for decades one of the very best mics for professional recording of musical instruments, and is still available, though at a hefty €400 each. Due to its unsurpassed fast transient response, it is particularly good for bowed strings, stringed keyboards and percussion.
(For top-quality recording of voices and wind instruments other models are preferred, slightly slower in transients but slightly better in flat response curve, and mostly more affordable as well). The MD 421 includes a bass attenuation filter with five settings, ranging from “M” (“Music”, with no attenuation, useful for instruments with significant low-bass contents such as keyboards, large drums, double basses, cellos and male voices) to “S” (“Speech”, with attenuation -5dB at 400Hz, -10dB at 200Hz and -14dB below 100Hz, useful for female voices and high woodwinds): the attenuation helps to eliminate unwanted background bass sounds, typically people moving around on the stage.
Let us review the available settings and recommended hi-fi alternatives for these “non-dedicated” external hi-fi microphones, which are plugged into the camera's “[MIC] socket”, but not connected to the hot shoe:
- [Mic Level Limiter]: This is a sound compressor:
- ON: “Compressed input level”. This alternative is normally not used for hi-fi sound.
- OFF: “Linear input level”. Allows you to select the [Mic Level Adj.] (see below) to avoid overloading distortion. It also forces the [Mic Level Disp.] to ON.
- [Mic Level Adj.]: Sound input level control, adjustable in 19 steps from - 12 dB to + 6 dB.
This is only available when [Mic Level Limiter] is OFF.
The low output voltage of “dynamic” microphones may require the maximum +6 dB setting.
- [Mic Level Disp.]: Horizontal stereo bar onscreen showing input level.
- ON: This is the only alternative when [Mic Level Limiter] is OFF.
- OFF: Does not show the bar. (Default setting when [Mic Level Limiter] is ON.)
- [Zoom Mic]:
Coupled to the lens zoom action:
 ON: As the lens zooms into telephoto, stereo separation is reduced for better recording of sounds far away in front of the camera. General input level is reduced.
- OFF: No effect.
- [Wind Noise Cut]:
- HIGH: Minimises the low-pitched sound when a strong wind is detected.
- STANDARD: Reduces the wind noise without deteriorating the sound quality.
- LOW: (no specs).
- OFF: No effect.
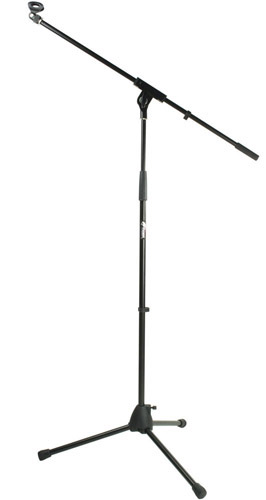
Hi-Fi Mic support. A microphone not inserted into the camera's hot shoe needs a support. A low-priced lightweight one with a tiltable arm (a “stand with boom”) can be very effective for occasional recording. We got from Amazon, at €30 each, the Tiger MCA68-BK (see picture), which is also easy to fold down for transportation.
Video Divide. This FZ300 facility is very useful. You often take a video of a song or piece where you need to cut an unwanted start and an unwanted end. Or else you took a video of a recital and want to split it into the separate pieces or songs. Doing this in the PC is problematic: editing movies in most amateur video editors yields corruption in either the video or the sound, and most professional video editors are very difficult to manage and unless you are very knowledgeable they are likely to change the format, thus introducing unwanted distortions as well. Enter FZ300 Video Divide: just follow the directions on p.247 of the Operating instructions for advanced features manual. Use them together with the ones on p.39 of the Basic Owner's Manual: here you will see, for example, how to fast forward to reach near the end where you want to cut out an unwanted final part.