
Customisation of the FZ300 buttons & menus
This is my suggested minimal customisation, affecting the Fn2 and Fn4 buttons, the Zoom levers and the Q.MENU. But first let me comment on how to save different customisations.
Save and Restore via Mode C
For a long time, most serious cameras have allowed to save the user's settings to a “Custom” value. This is useful as a backup, in case one deletes or modifies accidentally some settings:
- SAVE: by pressing the MENU button, Custom, Custom Set Mem., we can select C1, C2 or C3: at this point we get onscreen the message “Overwrite Current camera settings with Custom Set n”?. If we select “Yes”, actually the opposite happens: we overwrite the Custom Set n with the current camera settings!
- RESTORE: You will not find anything like “Overwrite Current camera settings with Custom Set n” in the Manuals but the functionality is there. Just go to the Advanced Manual, p. 112. The text is ambiguous and appears to suggest that by setting the Mode Dial to C, you only load the store settings temporarily, but this is not the case: they remain loaded even when you turn your Mode Dial to other modes such as P, A, S, M.
Silent Mode via Fn2
Features such as the AutoFocus lamp, the flash and the sounds are certainly very useful. Yet occasionally—for example in museum and churches—we want the camera to be much less conspicuous. Luckily the FZ300 has a Silent Mode that, when turned on, temporarily prevents the camera from emitting any sound and any light other than the screen.
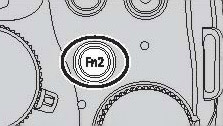 Silent Mode is normally assigned via the Quick menu, but if you need it frequently you can assign it to Fn2. (At the time of purchase, Fn2 is assigned to “Temporarily changing the items assigned to the side/rear dials
[Dial Operation Switch]”, a functionality I do not find particularly useful).
Silent Mode is normally assigned via the Quick menu, but if you need it frequently you can assign it to Fn2. (At the time of purchase, Fn2 is assigned to “Temporarily changing the items assigned to the side/rear dials
[Dial Operation Switch]”, a functionality I do not find particularly useful).
Preview Mode (or Flash Mode) via Fn4
Ever since the good old reflex 35mm-film cameras, the image of the picture you are about to take has been shown in the viewfinder at maximum aperture. This has the following consequences:
- Desirable: it shows the image with full brightness and helps to achieve an accurate focusing.
- Undesirable: it shows out of focus items that, if you set any aperture other than the maximum one, are actually in focus in the final picture.
This undesirable effect was already mitigated in old 35mm-film reflex cameras such as the Canon
AE-1, which I used for over a decade: pushing a special lever the diaphragm blades closed, showing the viewfinder image with the real depth of focus, although the image was inevitably darker. The FZ300 replicates this old functionality: after you have focused, especially so if you are using Manual Focus for a carefully crafted picture, you can set the Preview Mode: the lens blades close and the image shows the real depth of field: WYSIWYG! (“What you see is what you get!”). Also, the FZ300 improves on the old 35mm-reflex ones: it compensates electronically the image so that the brightness remains unchanged.
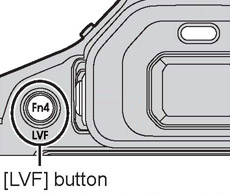 This Preview Mode functionality needs a quick on-off control, and I have assigned it to the Fn4/LVF button. (At the time of purchase, Fn4/LVF is assigned to forcing the switch between the screen and the viewfinder, but I find this unnecessary due to the excellent automatic functionality of the Eye sensor, which switches as soon as anything approaches it).
It is instructive to see the real thing in action. Just set the Mode Dial to M, the aperture to 8.0, and then look at the lens from the camera front with a small torch: you will see inside the lens at the end a central small hole about 2mm in diameter. Now press Fn4 and the hole will be reduced to about 1mm in diameter. Please be careful not to drop or otherwise damage the camera when handling it in this way.
Alternatively, if you are not engaged into very carefully focused pictures but you need to quickly change your flash status for social photography, you may prefer to assign this button to the Flash Mode (normally set with the Q.Menu which requires two keypresses instead of one).
Zooming continuous and stepwise
Amazingly, the FZ300 zoom control has four binary alternatives:
- Either slow (moving slightly the zoom lever) or fast (moving the lever fully to either side).
- Either continuous or stepwise between 35-mm “preset” round values: 25mm, 28mm, 35mm, 50mm, 70mm, 90mm, 135mm, 160mm, 200mm, 250mm, 300mm, 400mm, 500mm and 600mm..
The “stepwise” feature is very useful when, while taking pictures with different zoom settings, you wish to take some with exactly the same zoom setting: “nailing” an exact value in millimetres with the continuous zoom is almost impossible, and the “stepwise” feature fits the bill beautifully.
Even better, the Custom Menu allows to set separately the usual zoom lever and the side lever. Quite obviously, I have set the zoom lever (the one around the shutter button) to continuous, and the side lever to stepwise, so that I can use both features alternatively without having to fiddle with either other buttons or Menu settings.
Prevent nose-touch-screen while using the viewfinder
When using the viewfinder, the touch screen is virtually useless and actually your nose is very likely to touch it often: very annoying! Luckily the FZ300 has an option to disable the touch screen when the viewfinder is on: in Recording Mode, press the Menu Button, select the “Custom” group (3rd from above), go to the last page (9/9), enter the “Touch Settings”, enter the last option “Touch Pad AF” and select the OFF setting.
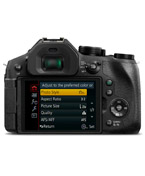
Q.MENU: My settings
The Q.Menu has two alternatives: DEFAULT and CUSTOM. You cannot change the DEFAULT, but you can just use always the CUSTOM, easy to set by a clever touch screen interface well described in the manual and onscreen. Every Q.MENU “line” has 5 icons: therefore, to avoid having to move between “empty icon spaces”, it is best to customise the Q.MENU with multiples of 5 icons. In my CUSTOM setting I have omitted redundant items (such as ISO Sensitivity and White Balance, available with their dedicated buttons) and have assigned the following 10 icons (for more details see my Pocket Manual):
- Photo Style (effects)
- Metering (Multi, Centre, Spot)
- Flash Modes (Forced, Red-Eye, Slow Sync)
- AFS/AFF (Auto-Focus Single or Moving Subject)
- Burst Speed (60fps, 12fps, 6fps, 2fps)
- Shutter Type(Auto, Mechanical, Electronic)
- Stabilizer (Normal, Panning, Off)
- Picture Quality (RAW, JPEG HI, JPEG LO) (*)
- Picture Size
- Motion Picture Size
(*) Since I always use JPEG HI, lately I have here instead HDR (On, Off)