


Polar Alignment with the Avant mount
This is the very first operation to be carried out every time the telescope is assembled, before starting with any sky observations that use the Avant Equatorial feature.
1. DO I NEED POLAR ALIGNMENT? If you have assembled the telescope in a hurry and/or you just wish to locate quickly an object (as opposed to watching it for some minutes) then you will find that using the Avant AZ/EQ mount in Altitude-Azimuth mode (“AZ”) is best. For this you set the Latitude lever to 90º and block it there. Then to locate the sky object you first turn the “Right Ascension” knob to orientate the telescope to any of the 360º around the horizon (the “azimuth”), then you turn the “Declination” knob to raise the telescope between 0º to 90º as needed. Problem is, as the earth rotates, your object moves in the eyepiece and within some ten seconds you have to start chasing it with both knobs: this is distracting and, if the object was hard to find, is easier said than done. Also, needless to say, is useless for astrophotography.
The normal use of any telescope is in Avant's Alternative Equatorial mode (“EQ”), where you orient the Avant so that the Right Ascension movement follows the Celestial Equator, its axis pointing to the Celestial North Pole. Pointing the telescope to the desired sky location is more difficult, but once your object is in view, as the earth rotates you just move the Right Ascension knob with the one hand. This is easier and practical and leaves you other hand ready for focusing or dealing with astrophotography equipment. EQ mode requires the above-mentioned orientation towards the Celestial North Pole, also called “Polar Alignment”, which we are going to explain below.
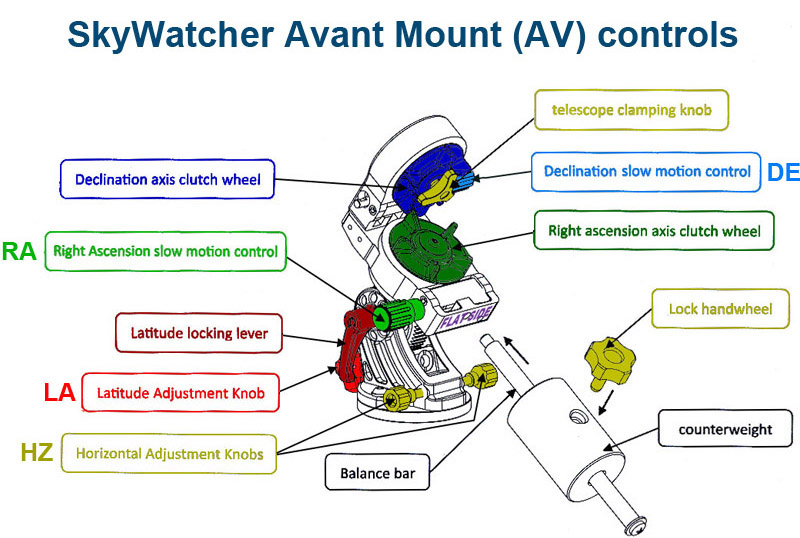
In my opinion many webpages with directions for Polar Alignment (such as the Wikipedia entry) are confusing and not easy to follow, others are too elaborate for our amateur telescope (such as the one in the Sky and Telescope website) and still others require expensive equipment meant for high-quality astrophotography beyond the capabilities of our telescope. The tutorial below applies to the Northern Hemisphere, where the Polaris star is visible: the general concepts apply to any EQ mount, but the directions are specific to our Avant mount. We have included different procedures according to circumstances and the accuracy desired. See below the controls for the Avant mount: I have added abbreviations for some common controls. Note that the Avant's Horizontal Adjustment Knobs (“HZ”) are exceptional in that they work by loosening out one and screwing in the other.
2. INITIAL PREPARATION OF THE TELESCOPE
- Have your SkyMax-102 AV telescope assembled: this includes tripod, mount (with counterweight) and telescope.
- The latter should be fitted with a finder, a diagonal and a wide-angle eyepiece such as the bundled 25mm.
- Put the telescope where you will carry out your night's observation.
Note: once you have polar-aligned, if you move the tripod only slightly you have to re-align! - Looking at the bubble level in the tripod (the one in the Avant is often covered by other items) move around the legs so that tripod and mount are level.
3. INITIAL POSITIONING OF THE MOUNT
In the pictures the upper part of the Avant is tilted, and its “FLAT SIDE” is parallel to the HZ knobs. However, for Polar Alignment, we need to start with the upper part horizontal, and its FLAT SIDE parallel to the mounts black Latitude movement. To achieve this, proceed as follows.
- Move LA to 90º (on the Latitude Scale). Lock LA with the Latitude Locking Lever. The "Sky-Watcher AZ-EQ Avant" label is now horizontal.
- Turn RA so that the FLAT SIDE becomes roughly parallel with the black mount movement, or else to the vertical side of the mount opposite the Latitude Locking Lever. Lock RA with the RA clutch wheel.
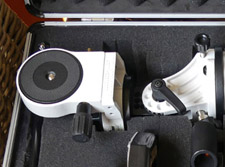 SUGGESTION: store the Avant mount in the case aligned this way, which is what we do as shown in our Bags and Cases webpage (see picture). When you take the mount out of the case, this POSITIONING procedure is not needed!
REMEMBER: Polar Alignment means to have the upper part of the mount pointing to the Celestial North Pole. To achieve this, you do not move the RA and DE knobs during alignment, but only at the beginning for initial positioning, and also at the end for the verification.
4. ROUGH AND READY ALIGNMENT - REQUIREMENTS
 This easy and fast procedure is useful in the following circumstances:
- For beginners who may find more advanced procedures cumbersome.
- For casual non-astrophotography observation.
- When—due to either poor visibility or obstructions—the Polaris star is not visible.
For this procedure, other than the above preparations you need:
- A good Luminous Magnetic Compass as described in our External Accessories webpage. (The typical keychain or pocket compass with only “the 8 orientations” will not do, and the compass included in some wristwatches and smartphone apps may not be reliable enough.)
- To know your present Geographical Latitude to the nearest degree.
5. ROUGH AND READY ALIGNMENT - PROCEDURE
- LATITUDE
• Loosen the Latitude Locking Lever.
• Turn LA so that the Latitude Indicator points to your present Geographical Latitude.
• Tighten the Latitude Locking Lever.
- NORTH
• Slightly unlock the mount from the tripod so that mount-and-telescope turn freely around the tripod.
• Hold the Compass, pointing North, a foot above the telescope (to prevent deviation due to iron components).
• Rotate the mount so that the telescope is aligned with the Compass: the LA knob now points South.
• Go a few feet away and check with the compass the North-South alignment.
• Lock the mount firmly to the tripod in this position. You're Polar-Aligned!
6. ACCURATE ALIGNMENT - FIRST STAGE
For extensive observation sessions and for astrophotography we recommend an accurate procedure such as the one described below. To the requirements for Rough and Ready alignment you should add also the following:
- Spirit level. Not professional, but more accurate than the minuscule ones in tripod and mount.
- Calibrated finder. See our Finders & Calibration webpage.
- Knowledge—from any astronomy software—of the rough relative position of Delta Ursa Minoris and Polaris.
The new Accurate Alignment begins as follows:
- INITIAL POSITIONING OF THE MOUNT. See section 3 above.
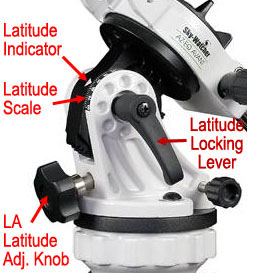
- MOUNT LEVEL (VERIFICATION). Place the spirit level against the Avant's “FLAT SIDE” (see the picture): having initially levelled tripod and mount with their small bubble levels, the 90º Latitude setting should guarantee that the FLAT SIDE is perfectly level. If it were not, fix this by slightly moving the tripod legs.
- TELESCOPE LEVEL. Unlock DE and move it so that the telescope (covered) points roughly vertical. Place the spirit level over the telescope's cover, move DE for a perfect vertical position, then lock DE with the clutch.
- LATITUDE and NORTH. Same in section 5. above.
In the above steps, the ROUGH and READY procedure has been preceded by new steps, which guarantee that the mount is accurately level and that both telescope and finder are duly Polar Aligned.
 7. ACCURATE ALIGNMENT - FINE TUNING
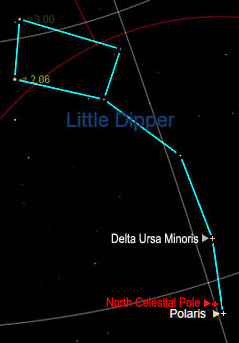
- The picture shows that the Celestial North Pole lies off from Polaris towards Delta Ursa Minoris, about 1/9th of the distance between them. Mind their rough relative position, which you have checked with an astronomy program.
- Looking through the Finder, improve the alignment so that it accurately points to the Celestial North Pole:
- For fine horizontal movement use the HZ.
- For vertical movement use the LA, then block it.
- Verify: unlock the RA and—one hand grabbing the telescope the other the counterweight— rotate the telescope around while looking through the finder. The Celestial North Pole will stay centred while other stars revolve around it.
- With polluted skies, Delta Ursa Minoris is only visible with a finderscope. Mind that it reverses the view left-right. With your 6x30 finderscope, when you point to the Celestial North Pole, Delta Ursa Minoris is just at the end of the FOV.
[For still more verifications and refinements—recommended for the Avant with longer telescopes such as Newtonians— please see the tutorial in this excellent video by Martin Pyott, min. 31:30 to 40. Note that his procedures are different from the ones explained here.]