


Fine Calibration of the Finders - Fitting two finders
In this text “finder” means either a red-dot finder or a finderscope.
FINE CALIBRATION OF THE FINDERS
Introduction. Perhaps one of the main issues with this type of telescopes is the often-excessive tolerance of 1.25" barrels and finder-calibration screws. Add to this that your diagonal is not always inserted in the same angle, that your diagonal and eyepieces are fixed by two screws that are advanced to different extents, that finderscopes rotate and their adjustment screws do not guarantee accurate “return” to marked-out positions, and you are in trouble. One night you carefully calibrate your finder and the following night (same hardware, same location, same weather) you find it out of calibration. Typically. when you try to point the telescope at a small thing such as a planet, this happens:
 25mm eyepiece, the slight deviation is no problem.
- 10mm or smaller, it takes quite a time to find your planet on the telescope.
- CMOS camera with Focal Reducer (see our Astrophotography webpage): 10mm-equivalent, but now your eye instead of going from finder to eyepiece goes from finder to laptop screen. You need to recalibrate the finder!
- CMOS camera without Focal Reducer: 5mm-equivalent, impossible to find anything.
The solution is to perform a very accurate calibration for all the possible situations. I am assuming the use of a 90º diagonal, otherwise the operations below need the obvious repeat/fix.
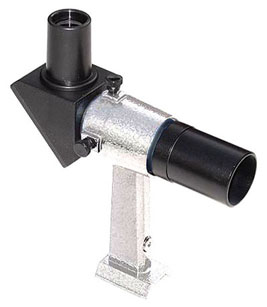
Also, for the CMOS camera a red-dot finder is unlikely to work: you need the magnification of a finderscope (see picture). In the sequences below, I typically use the red-dot finder for eyepieces and the finderscope for the CMOS camera, but sometimes this changes.
Calibration screw positions. For every finder and every adjustment screw, you should have a mark that shows its position against a 12-hour drawing. If the finder is black, you should glue into it a round piece of paper. If it is white, mark the 12 hours using a waterproof marker.
Calibration sequence. Every amateur knows what it means to calibrate a finder. Directions for the beginner:
- Subject: Find a far-away mountain (daytime) or Moon (nighttime) where you can identify a central "spot".
- Finder: Move the telescope (using the Right Ascension and Declination knobs) until you see through the
finder that its dot/circle/cross is perfectly centred on the “spot”. - Telescope: Watch through the eyepiece. You almost certainly will not see the spot, or it will be off-centre.
- Telescope: Move it again until you have the spot exactly centred.
- Finderscope: Calibrate it moving its two screws until it points again to the spot.
(Do not touch the mount knobs—Right Ascension and Declination—in this process!). - Log: Write down the above setup and the final positions of the finder's screws.
Anyway, due to changes in the above-mentioned mounting tolerances, and also in temperature, chances are that you will need to calibrate again at the beginning of every night's observations. Let us see more details for the different possible situations.
Daytime Calibration. If you have a good far-away spot, since this does not change with the earth rotation, daytime calibration is easy and accurate, and with some luck it may—or again it may not!—stay valid later for nighttime. For each one of your finders (red-dot and finderscope) you should perform the above Calibration sequence twice: first for a 10mm or similar magnification eyepiece, then for the CMOS camera (5mm-equivalent).
Smartphone Calibration. We have tested adding a smartphone adapter and a smartphone: due to flexibilities in tripod and mount, their weight adds a few degrees to the Altitude the telescope points at, but it may not change the finders' calibrations, except perhaps for 10mm or higher-magnification eyepieces. Anyway, if you are in for an extensive smartphone photography session, you should start by calibrating the finder with the Smartphone inserted: just use your smartphone adapter to move it out of the way so that you can see through the eyepiece enough to perform the calibration.
Night-time and CMOS camera Calibration. This is to be performed at the beginning of every observation night. When using a CMOS camera, having tried and more often than not failed to spot the darn planet on the screen, I only succeeded by performing the calibration using the Moon (at least one-third of it should be lit). The steps:
- Select as your “spot” a Moon crater that is clearly visible and has a middle peak, such as Copernicus, Eratosthenes, Agrippa or Tycho. Either a printed Moon map or an astronomy software may be of help.
- If you have a finderscope, insert it.
- Insert a 10mm or similar magnification eyepiece.
- Perform the above Calibration sequence. (This initial approximation makes CMOS camera calibration easier.)
- Swap the eyepiece for the CMOS camera.
- Perform again the Calibration sequence.
Now the finderscope will be the precision tool you need for high magnification eyepieces and—mainly—for photography of solar system objects, and also—hopefully—for particularly bright deep-sky objects in dark-sky locations.
FITTING TWO FINDERS
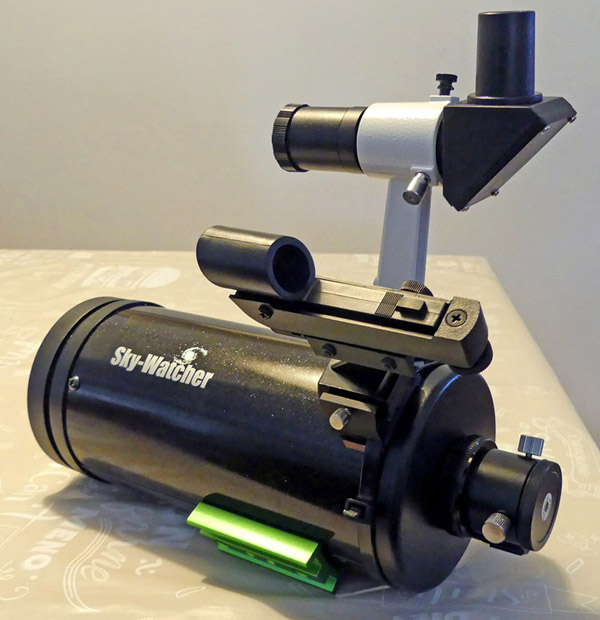
According to your preferred telescope usage, you may wish to have two finders (normally a red-dot finder and a finderscope) installed one beside the other in your SkyMax-102.
Our SkyMax-102 telescope carries a single finder “shoe”. Orion produces a “dual finder bracket”, but it costs €40, it weighs in the region of 150g and it adds about 5cm in height. If mounted on it, the finderscope tube axis will be about 16cm away from the external telescope surface. This is undesirable not only for ergonomic reasons but also because it places significant weight off-centre, thus adding to the tendency of the SkyMax-102 AV to vibrate.
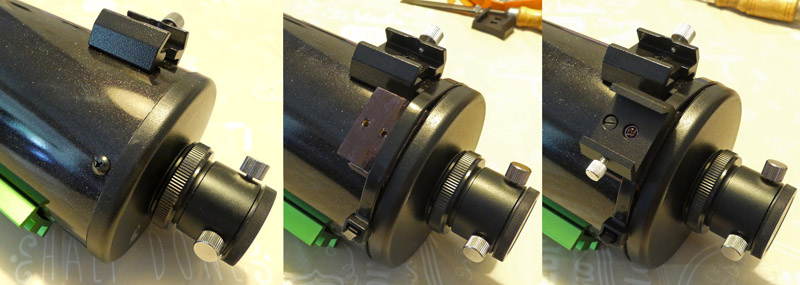
The best solution is to add to the telescope's cylinder an additional finder shoe. To glue the shoe in place, the base should be curved with a diameter matching the 120mm of the telescope, but they are only available with their base either flat or curved with diameter 100mm: I got the latter it—SkyWatcher Finder Shoe Curved— and soon found that it was not possible to sand it to the required 120mm-diameter using common amateur/woodworking electrical tools. At this point, whether you got this curve-base shoe or better a flat-base shoe, the only way is to screw it with its two screw holes. However, you do not wish to pierce a Maksutov, as the debris will inevitably end on any of the three internal optical surfaces. The solution could not be simpler: find a piece of wood the size of the shoe and 5 to 7mm thick, pierce it for the two screws, cut it for a zip cable, paint it black with a common marker and finally attach to it two wedges so that it roughly follows the telescope external cylinder. See the pictures:

Now apply to the underside of the wood piece double-sided adhesive tape, affix it against the telescope's border, and hold it fast with a 8.5mm-(1/3in-)wide zip cable (middle picture below): the cable will go over the three external telescope screws but this is no issue, there is enough contact with the cylinder to keep the whole thing firmly in place. Finally screw to the wood piece the new shoe (picture on the right below): it will be surprisingly solid, though not as rock solid as the original one.
Now you can attach two finders: the new shoe should be used only for the lightweight red-dot finder.
You may later need to add small washers or cardboard pieces between the shoe and the wood piece, so that the red-dot finder calibration you got with the normal shoe is still valid when you use it on the new shoe.