


Astrophotography: Smartphone or CMOS camera
SkyMax 102 AZ-EQ Avant limitations. All the websites devoted to astrophotography assume a significant investment (a few thousands of U.S. Dollars or Euro) in a motor-driven mount, a larger telescope and a DSRL camera, not to mention years of learning! On the “opposite side” is our SkyMax-102 with its Avant mount, specifically sold as “not suitable for astrophotography”: the reasons will be explained further below. Finally, some websites have reported that the frustrations of astrophotography are the #1 reason why people quit the hobby of amateur astronomy. This is a typical warning about astrophotography I found in one of those websites: “The three basic rules of amateur astrophotography: 1) Don't!, 2) Don't!!, 3) Don't!!!”
So you have been warned!!
If you want to proceed, the following directions reflect my personal often-frustrating experience.
Finderscope Calibration and Polar Alignment. These are essential initial operations for an astrophotography session. Please read our webpages Finder Calibration and Polar Alignment. A very accurate Polar Alignment is only required for DSLR long-exposure photography, which we will not attempt here. For smartphone or CMOS camera movies we do not need an immobile sky object: it should just remain inside the FOV while we take the movie.
DSLR or Compact cameras: a “no, no!”. I have tried taking pictures through the SkyMax 102 using compact (i.e. non-DSLR fixed-lens) digital cameras, but telescope-camera mounts mostly support only pocket cameras, which lack manual focus. I have also tried with a top quality DSRL camera, but investing in such a camera does not make sense with the limitations of a non-computerised mount, and if you already own a DSLR camera you will find that this telescope is really unfit for such a use: the tripod and mount produce vibrations that require shutter speeds in excess of 1/1000"! With this telescope the only practical solution is to use either a recent smartphone particularly good for pictures, or an affordable focal-plane CMOS camera. Let us scrutinize these two alternatives.
Smartphone. Nothing beats the flexibility (and low cost because most of us already have one) of the smartphone, used with semi-pro-grade camera apps such as NightCap Pro for iPhones or Camera FV-5 for Android. These apps give you sophisticated touch-and-focus, infinite focus, advanced photometry and more, full worth the 2 or 3 Euros the app is worth and the hour or so of practice until you get to grips with the app. Needless to say, you can also use your smartphone to take movies instead of pictures. Unlike the CMOS camera—inserted instead of an eyepiece as described further below—the smartphone with its small lens takes both pictures or movies through the telescope's eyepiece, thus putting to good use your whole palette of eyepieces and lenses, and their magnifications.
Smartphone Resolution and Sharpness. We have seen in our Resolution/Magnification webpage that this telescope delivers a 0.91" resolution (distance between line pairs). With a high-magnification 9mm 62º (=223,200") eyepiece, and a telescope of 1300mm, your true field of view is 223,200*9/(1300*0.91)=1698 line pairs, for which you need a minimum of 3396 pixels, equivalent to a 18Mpx camera. Alternatively, when using a wider-angle eyepiece, the largest object you are likely to photograph is the full Moon, with a the field of view of a 13mm 52º (=187,200") eyepiece, with a FOV of 187,200*13/(1300*0.91)=2057 line pairs, for which you need a minimum of 4114, equivalent to a 25Mpx camera. 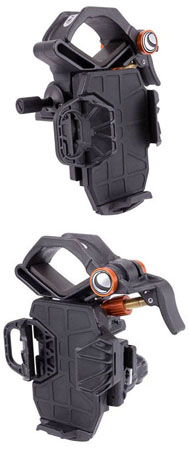 CONCLUSION: You need a smartphone with a camera of at least 20Mpx.
Telescope-Smartphone Adapter. The tricky part of using a smartphone is that, unlike the CMOS camera that is firmly inserted as if it were an eyepiece, the smartphone needs to be in a precise position “hovering in mid air” above the telescope's eyepiece. Clearly, the smartphone should be strictly ...
- parallel to the eyepiece, or else the picture will undergo distortions.
- in line (up-down and left-right) with the eyepiece to coincide with the field of view.
- at a very precise distance (a few millimetres, but every eyepiece has its requirement) from the external eyepiece lens, otherwise you will either not cover the full AFOV or conversely have the AFOV as a tiny central image surrounded by a black background.
Clearly you need to attach to the eyepiece a telescope-smartphone adapter that lets you move the smartphone accurately in three dimensions (up-down, left-right and near-far) with respect to the eyepiece, while keeping parallel to it. Low-price adapters lack the near-far adjustment and therefore you have to move it up or down the eyepiece, and then you have to move the smartphone along rough channels before fixing the final position with a knob, certainly not an accurate way. At the time of writing the only adapter that carries micrometric adjustment knobs for the three dimensions is the Celestron Smartphone Adapter NexYZ (see the pictures). Perfect it is not, but is relatively easy to use, once you have it and practise a little bit.
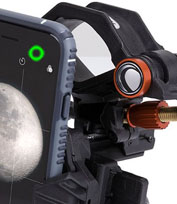 Smartphone Alignment. Whichever adaptor you use, and especially when watching a planet (a bright spot in an otherwise dark background) it is tricky to align to the eyepiece the smartphone camera, which you cannot see from the screen side of the smartphone. It helps to mark the smartphone externally, as shown in the picture on the right hand side (the camera is assumed to be where marked by the green circle, although obviously on the other side of the phone).
Smartphone and Finderscope Alignment. If you have calibrated your finder/finderscope and pointed your telescope to the sky object, when then you attach the adapter with the smartphone, their combined weight (about 500g) will throw the finder out of alignment. Solution: first attach the smartphone and then, using the adapter, move the smartphone as far as possibly out of the way, so that you can watch directly through the eyepiece: recalibrate the finder and point to the sky object again. This is the trickiest part, and more often than not it is hardly possible to get through it.
Tip: if the Moon is visible, first calibrate with it the finderscope, focus, and only then use the calibrated finderscope to move to the planet. Problem is, planet finding requires to start with a small-magnification eyepiece: if later you wish to change the eyepiece, you may need to recalibrate the finderscope. One way or the other, this is tricky indeed.
Smartphone Shutter. Another problem is that the telescope will vibrate when you press the shutter button.
Three possible alternative solutions:
- Intervalometer. Take many pictures with one touch: only the first few will be shaken! In FV-5 touch the mountain-icon for “Shooting Utilities”, touch the timer-icon+INT for the Intervalometer, set your preferences and finally touch START NOW. Minor limitation: the minimum time between pictures is 1 second. Problem: every time you wish to take a sequence, you need to touch 3 icons, because there is no Intervalometer icon available in the main screen.
- Timer. Set the self-timer (5 seconds is more than enough for the vibrations to dissipate). Most compact cameras disable the timer after a picture is taken, but in FV-5 it stays enabled until you disable it. Now you can have a single-touch no vibration picture! Limitation: forget about taking lots of pictures as fast as possible.
- Remote. Use one of the inexpensive smartphone-camera bluetooth remote shutters. I got the CamKix Bluetooth Camera Shutter Remote Control. (Like most Bluetooth hardware, once turned ON it may not work the first few times you press the button, but once it starts, it keeps working fine for the rest of the session.)
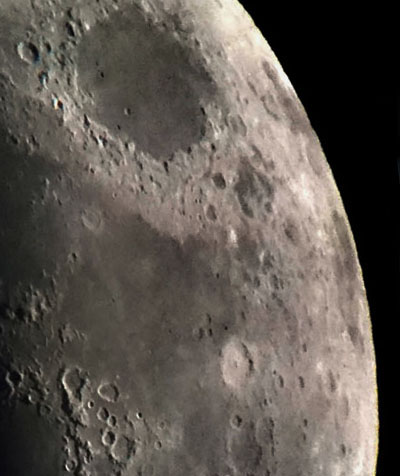
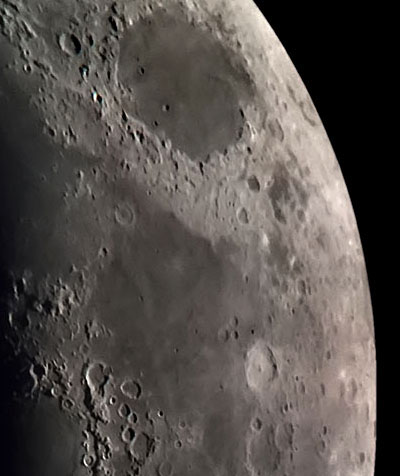
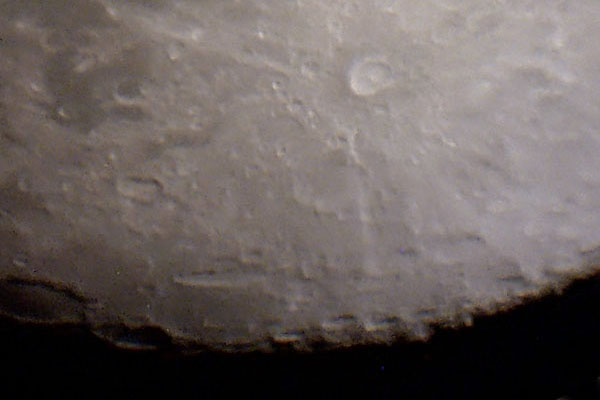
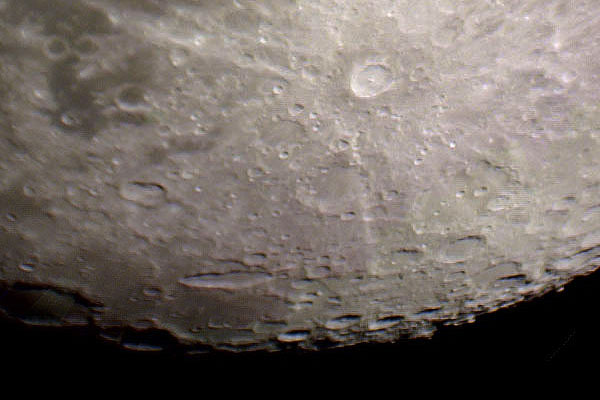
Smartphone and computer processing. After the photography session is over, moving pictures between the smartphone and a computer is easy and fast: you just connect both devices with a common USB mobile recharger cable and follow a few easy steps. Once you are up and running taking pictures with your smartphone, you will find it worthwhile to improve the quality of them by taking repeated pictures—or movies—and following, later in the computer, the process described below in the Aligning and Stacking section. Find below a detail from a photograph taken with the Explore Scientific Ar 9mm eyepiece: the upper circle is the Mare Crisium, then in the middle of the picture you can see the large Mare Fecunditatis, and to the right of it the bright Langrenus crater. The picture to the left is the best shot of a set of six, the one to the right is the result of aligning and stacking the six pictures with AutoStakkert!2 (see below), both suitably—and similarly—computer-processed afterwards. The stacked picture shows improved detail (slight but visible upon close examination) in spite of being made up of pictures inferior to the best one.
Finally, see at the bottom of this webpage the Final comparison: Affordable CMOS camera vs Smartphone.
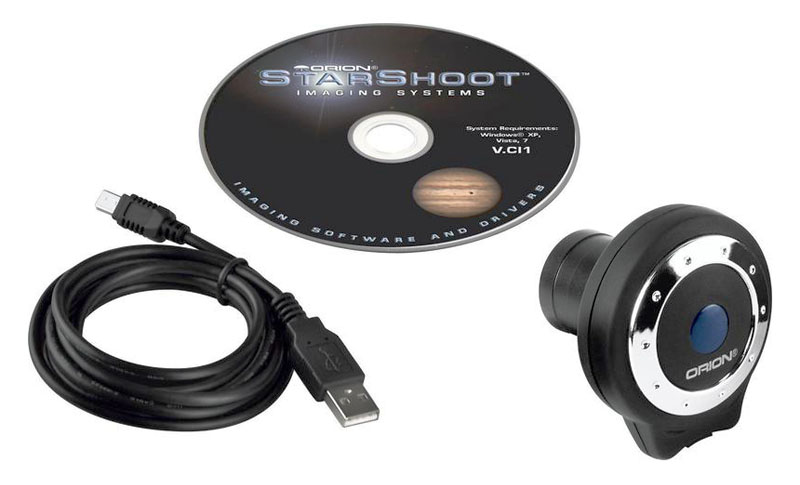
Affordable CMOS Cameras. Telescope-dedicated cameras can be very expensive, but a few affordable CMOS-sensor cameras are among recommended accessories for the SkyMax-102 AV. The CMOS cameras plug directly into the telescope as if they were eyepieces, and connect via USB to a laptop where you watch the image onscreen. These cameras are meant to take short movies, from which merged pictures are extracted, as described further below. I read good reviews of two cameras from the Orion Starshoot series: the Eyepiece Camera II (640x480px, €47) and the Solar System Camera IV (1280x1024px, €79). The Camera II is very affordable, but its resolution is too low for what is needed in most cases, so I went for the Camera IV. The enclosed CD and directions allowed for an easy software install. After some initial use I found that the camera and the software performed very well, although—as we will see below—it is really tricky to get useful results. In theory this “focal plane photography” should be easier to handle than a smartphone over an eyepiece, and the results should be distortion free, but unfortunately these advantages hardly apply to this particular telescope and CMOS cameras, as we will see below.
Field of view and Focal Reducer. These CMOS Cameras (I have found and downloaded manuals for the few available models and they appear to coincide on this point) have a field of view roughly equivalent to a 5mm eyepiece, with a magnification of about 300x for this telescope: this will be fine for a planet but excessive for the Moon. You need a Focal Reducer (see the Eyepieces & Lenses webpage), a simple lens to be inserted that unfortunately can cost almost as much as the CMOS camera. When you attach to the camera a Focal Reducer 0.5X and insert the pair into the SkyMax-102 you get the rough equivalent to a 10mm eyepiece and 150x magnification.
Please disregard the webpages advising to attach the Focal Reducer lens to the end of the diagonal: with this lens and telescope this will not work. You should attach this lens to the barrel of the eyepiece or camera, and screw it tight, because being just one or two millimetres away produces noticeable coma in the borders or the image.
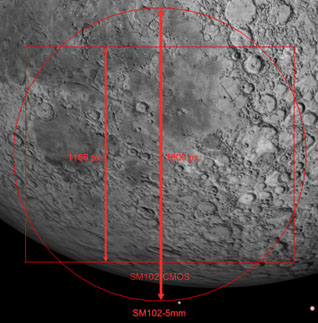 Camera Resolution and Sharpness. We have seen that this camera with our telescope yields a magnification of about 300x, much more than what our telescope supports! However, appearances are deceptive, because we did not factor in the camera's sharpness. If we calculate the camera's field of view compared to a similar eyepiece (see picture), after lots of calculations we conclude that the camera should have a minimum vertical resolution of about 1100 pixels. At its 1084 pixels it just gets there, but the good news is that with these cameras you take movies and then use software to “align and stack” frames (see further below), eventually getting significantly better results. However, it is not easy to match the quality of what you can see with your eye through a good eyepiece. Further, when you have a larger sky object (such as the full Moon), you need a larger FOV, so you insert into the camera the Focal Reducer 0.5X to get the equivalent of a 10mm eyepiece: at this point you need twice as many pixels, and your camera will fall significantly short of what a 10mm eyepiece delivers.
Had you gone for the 640x480 camera, clearly you would be much worse off: this camera is only good for small pictures of the moon and, very occasionally, for an eclipse. In my opinion it is not worth the expenditure and effort.
Installation and software. The Orion Starshoot cameras come with an installation CD complete with introductory movie, driver software, Amcap capture software and links to align-&-stack software. Follow the directions and you will find that the software installation is relatively easy. Just mind that you are likely to be using a laptop to go around with the telescope and use the CMOS camera: therefore in the laptop you only need to install the driver and the capture program (see “Recording movies” below). Then you will also need relatively powerful desktop PC with a large monitor for the "day-after work": aligning, stacking and further processing the pictures (see “Aligning and stacking” below).
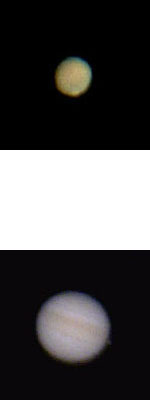
Recording movies. With these Orion CMOS cameras and software you do not take pictures: you record short movies—typically at 15 frames per second—lasting typically 10 seconds: a longer time requires a motor drive, because otherwise with the earth rotation your sky object would fall out of the screen! Learning to use this capture software (Amcap) is relatively easy, but you need some practice when using it with the telescope. You see onscreen in the laptop what your camera sees through the telescope, you move the latter around to find your sky object, you focus the telescope checking onscreen and finally, without moving the telescope, you capture the movie in the laptop. Again, for a movie of a few dozen frames, as soon as your object stays within the field of view, the Earth rotation and therefore apparent movement of the sky object is irrelevant. For longer movies you need a Motor Drive (see at the bottom of our Telescope Accessories webpage). Once you have taken the movie(s) you can watch them straight away in the laptop with any of the standard movie viewers the laptop has by default. Please see below three frames manually selected from three movies (Moon, Mars and Jupiter obviously) that I took with our SkyMax-102 AV telescope and the Orion Starshoot Solar System Camera IV.
Warning: The CMOS camera requires its own finder calibration. This is not easy: even with a bright planet you will find it very difficult to spot it with the camera in order to recalibrate. Far away lamp posts give an impossible parallax error. The only way known to me is, if the Moon is visible, to first calibrate the finder with the Moon.
Beware to avoid Amcap's pitfalls: When Amcap records a movie, it stores it in a unique fixed file, which you select only once with the menu sequence "File-Set Capture File". From then onwards, once you have finished “capturing” a movie, you should go to the menu "File-Save Captured Video as ..." and save the new movie as a new file. Fail to do this and your movie will be— without any warning!—deleted as soon as you start capturing your next movie. Also, when you start Amcap, it “defaults” not to the “Default 1280x1024” resolution but to 640x480: remember to fix this every time!
1st learning curve. As commented above, just finding the sky object through the CMOS camera can be a daunting task. Your best bet is to use a finderscope, carefully calibrated with the Moon as per our directions above.
 Aligning and stacking. If you have taken a movie through any telescope, whether with a smartphone or a camera, because of the magnification, the individual movie frames not only move (because of the earth's rotation) but also shake and vary in their quality and focus. For good results you should use—in a relatively powerful computer—a program that
(1) facilitates the selection of the best movie frames among the few hundreds in your movie, (2) aligns them and
(3) stacks them into a final improved picture. Two of these freeware programs are recommended in the Orion Solar System Camera IV's CD,
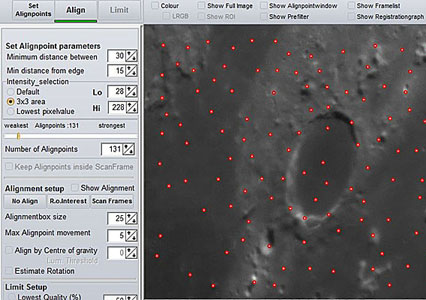
RegiStax 6
(see the screenshot) and AviStack 2: comparative reviews can be found online. Yet another freeware, which I find easier to use and very efficient in computer time, is AutoStakkert!2. These programs can work with either a digital movie or a set of digital pictures (typically from either a smartphone or a previous align-and-stack processes).
Aligning and stacking. If you have taken a movie through any telescope, whether with a smartphone or a camera, because of the magnification, the individual movie frames not only move (because of the earth's rotation) but also shake and vary in their quality and focus. For good results you should use—in a relatively powerful computer—a program that
(1) facilitates the selection of the best movie frames among the few hundreds in your movie, (2) aligns them and
(3) stacks them into a final improved picture. Two of these freeware programs are recommended in the Orion Solar System Camera IV's CD,
RegiStax 6
(see the screenshot) and AviStack 2: comparative reviews can be found online. Yet another freeware, which I find easier to use and very efficient in computer time, is AutoStakkert!2. These programs can work with either a digital movie or a set of digital pictures (typically from either a smartphone or a previous align-and-stack processes).
Hardware needed. RAM: with present operating systems using from 2 to 3 Gigabytes, your computer should have 8Gb or more. CPU: in the Intel range of processors, a Pentium 4 or Core Duo will be way too slow, but most of the recent Intel Core i5 and any Intel Core i7 will be perfect. Price is a good indicator: if your computer cost less than 500 Euro or U.S. Dollars, chances are that it is not up to par for this type of process. If it cost from about 700 up, it should be fine. Processing a typical 10sec. 15fps movie (150 frames) should take just a few minutes.
Pre-alignment. The align-and-stack programs assume that the images are slightly misaligned (typical of a few seconds of movies), say not more than 20 pixels. Otherwise the final result will show visible parts out of alignment. If your source rather than a movie is just a handful of pictures, it is best just to select a central feature (typically a Moon crater) and align them by hand: for example in Photoshop and similar programs you copy one image over another, set it to 50% transparency, move it to align, set to 100%, copy and paste over the first image. If you instead have many images you can use a specialised automatic alignement program such as the freeware Planetary Imaging PreProcessor (PIPP).
2nd learning curve. Align-and-stack software is not what I would call “user friendly“. Search online for the scarce tutorials and advice available, and be ready to spend hours—and days—until you learn your way. This said, the programs' default values (with a minimum of common-sense changes) provide good results in most cases.
Photo processing. Once you found your sky object, captured movies and had your images aligned and stacked, the most difficult part is over. Now you should process the images for centring, noise reduction, fixing the colour and other manipulations that are possibly with most photo-processing computer programs. See below what you get from Moon, Mars and Jupiter movies: compare with the three pictures above and the difference is impressive.
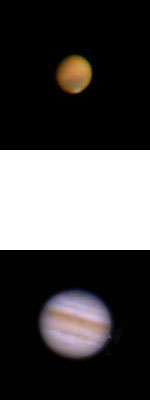
The Jupiter movie was taken during the planet's August 2021 “opposition”, which occurs roughly every 13 months: however, the planet is visible most days during the year. The mars movie was taken during the planet's August 2028 “opposition”, which occurs roughly every 26 months: when not near its opposition, Mars appears too small in the sky to get any significant detail with this telescope.
Final comparison: Affordable CMOS camera vs Smartphone (when used with the SkyMax-102)
- Advantages of an affordable CMOS camera:
- The CMOS camera places a digital sensor directly on the focal plane: the only optics used is inside the Maksutov tube. (The smartphone with its miniature camera through an eyepiece inevitably produces some distortions. However, read below about the distorsions implied by the use of the CMOS camera!)
- You focus the sky object with the telescope and this is reflected on the laptop screen. (Focusing the smartphone is tricky: even the “infinite focus” may fail to reproduce accurately the eyepiece's focus.)
- It often gives the best-quality image for a small sky-object such as a planet—provided you can spot it!—and a Moon crater.
- Advantages of a good-quality 20Mpx+ smartphone:
- It has been noted that the optics of a Maksutov expects the correcting effect of an eyepiece. The CMOS camera's pictures show slight off-centre “coma” that becomes obvious when a Focal Reducer is added. This is not observed in pictures taken with a smartphone through a good-quality eyepiece.
- The flexibility of your full set of eyepieces and lenses lets you deal with sky objects of all sizes. You can photograph the full Moon and then quickly swap a high-magnification eyepiece to examine a crater.
- You can dispense with the hassle of handling a laptop nearby. All computer work is done the day after.
To conclude. Astrophotography, even within the limitations imposed by the Avant mount (specifically not recommended for photography!), is a special branch of amateur astronomy, almost a hobby on its own, with a steep learning curve. The beginner will initially be successful only with large objects such as nature (daylight), the Moon and the Sun. With this telescope and mount, photography of the planets is much more difficult, and the results often limited in quality. Very-long-exposure being almost impossible, you can hardly photograph galaxies and nebulae.
The only way to circumvent these limitations is to replace the Avant by a computerised telescope mount, needed for long-exposure photography. At this point you should also leave aside both smartphone and affordable CMOS camera, and invest in either a DSLR or a more advanced telescope camera. Again, this is not the recommended use of our excellent yet lightweight and affordable SkyMax-102 AV telescope.