


Accessories to the Telescope and Mount
Other than the ones we have dealt with in the webpage Eyepieces and Lenses, we have Finders, Slow-motion cables, Filters, Diagonals and Cameras. As before, we assume below that whatever is inserted into the telescope tube, diagonal or eyepiece, has a 1.25" diameter. Also as before, some of these accessories you already had bundled with the telescope, others you do not need, others are optional and/or future add-ons.
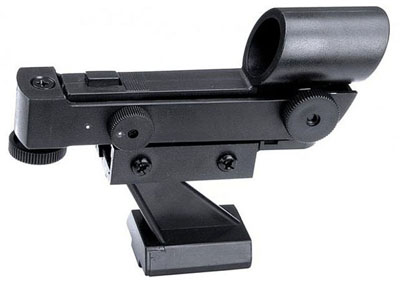
RED-DOT FINDER. This type of finder is ideal to point the telescope fast to an object in the sky that you can see with the naked eye, such as the Sun (with a solar filter!), the Moon or a Planet. The SkyMax-102 AV comes with the Skywatcher Red-dot Finder (see picture). If purchased separately it costs around €30, but the unit appears to be absolutely identical to the one sold under the Celestron brand for €15. This is a functional item (with a good potentiometer for power regulation) but basic: the regulating knobs do not work smoothly, making it difficult to calibrate this finder accurately. However, it is ideal for dailight use, both for nature observation (where the cylinder hood protects the view from sunglare) and for direct sun observation
(where it is easy to mount on the cylinder a DIY solar filter).
Eventually I bought the TS-Optics starpointer LED Red Dot Finder Scope. This is more than twice as expensive than the bundled Skywatcher at €70, but feels like a really superior piece of kit: (1) The unit shows a better material and finish. (2) The upper control wheel not only selects among 5 different intensity levels, but also the option of either red or green colour. (3) A further knob selects among four different symbols: red-dot, red-dot with small circle around, cross, and cross around a small square—actually made of four minuscule letters "T" pointing outwards—with a small dot inside. (4) The calibration screws are meant for fine movement using an Allen wrench, and a smaller Allen (both bundled) can be inserted in a hole to turn around an—invisible but functional—calibration blocking screw. Here also you can make a DIY solar filter for direct sun observation.
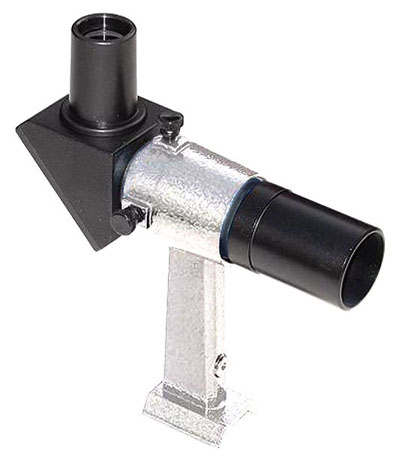
FINDERSCOPE. A red-dot finder will not help if you cannot see the sky object with the naked eye. For nebulae and clusters (“deep-sky objects”), as well as comets and others in light-polluted skies, the red-dot is only good for pointing fast to the correct region in the sky with respect to nearby constellations. However, you then need to swap it for a finderscope: with its about 6x magnification, it shows many more stars than the naked eye, and therefore with dark skies and a bit of luck you may be able to find your sky objects. As for planets, a red-dot finder is not accurate enough when you use a high-magnification eyepiece: here the finderscope is very useful indeed. Please note that, since you are likely to be using the telescope with a 90º diagonal, (see further below) it is helpful to get a finderscope with a diagonal too. I went for the Skywatcher 6x30 Right-Angled Finderscope (€45), a sturdy metal piece, perhaps a bit bulky for the SkyMax-102, but perfectly functional.
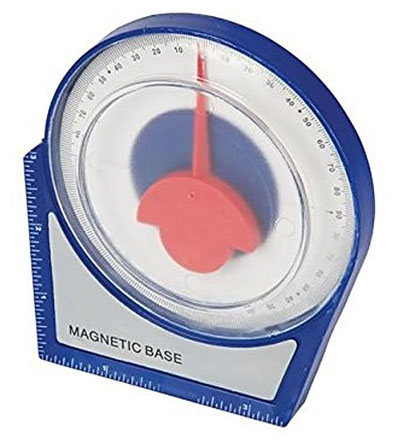
INCLINOMETER. To find a sky object with an Equatorial mount the "professional" way is to use the RA and Declination coordinates. But in this telescope there are no graduated scales for this. Therefore, although a properly-polar-aligned EQ mount will let you to follow the object moving only the RA control, to find it initially your best bet is to use the Azimuth-Elevation coordinates to find out where in the sky you should point the telescope. You get the object's Azimuth from a computer and find it visually with a compass. For the Elevation you need to set your telescope at that angle: for this you should use either the old “protractor, string and lead” or better one of its modern versions like the Silverline Inclinometer, perhaps not too accurate but inexpensive and easy to use, with a magnetic base that will attach (for a few seconds!) to the top border of the telescope tube.
SLOW MOTION CABLES. Although not listed as recommended accessories for this telescope, its Avant mount has the necessary protruding pieces to fit the useful Skywatcher Slow Motion Cables for EQ2, EQ5 and AZ3. This is a set where one of the cables is one inch longer than the other.
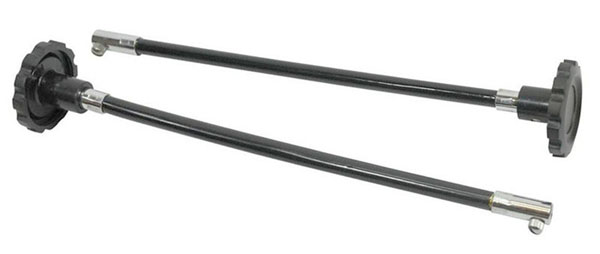
Problem is, since the protruding pieces in the Avant mount point in opposite directions, so will the slow motion cables. I have found it practical to fit only the short one, to the RA motion. Another problem is that it is not that easy to attach these cables. This is my recommended attachment procedure:
- Do it at the beginning of a night session, so that you can use a common white torch: you will need good light.
- Ensure that the retaining screw is retracted (but not so much that it falls out and you lose it in the grass!).
- Turn the knob so that the flat part of the protruding brass piece points exactly upwards.
- Insert into the brass piece the slow motion cable with the screw pointing upwards as well.
- Ensure that you insert it until the cable's end cylinder touches the mount (leaving a 1mm gap is no good!)
- Screw the retaining screw hard with your fingers, then use a 50 Euro Cent copper coin to give it that 1/2 additional turn that it needs to stay there for the rest of the night.
- Test that the attachment is firm by trying to move the knob and the attached cable in opposite directions.
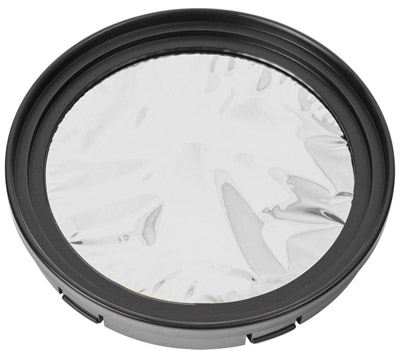
SOLAR FILTERS. These are based on an aluminium foil especially devised for Sun viewing, either directly or via a camera or telescope. Unlike other telescope filters, which are attached inside to the back of an eyepiece, the sun filter is to be mounted onto the large main aperture, to avoid burning inner telescope parts. Affordable ready-made solar filters (see picture) are available. Before buying check that its internal diameter is the same as the external one in the SkyMax-102, which is 116.6mm (+/-0.2mm). An alternative is the octagonal Explore Scientific Sun Catcher, the variant for 80-102mm telescopes, with foam inserts for adaptation to your particular telescope. Even more affordable is to buy a piece of sun-filtering material and to make your own filter using cardboard and black insulating tape. It took me two hours of hard work, and surely it was not worth it, but I had lots of fun!
IMPORTANT: It is pointless to insert a solar filter into the telescope to avoid damaging it and your eyes, just for later damaging your eyesight anyway when looking at the sun through your Red-dot finder! For this reason, using a piece of curved plastic I also made a small filter for the bundled red-dot finder.
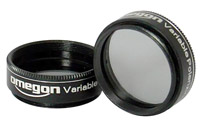 VARIABLE GREY FILTER. These are two polarised filters screwed together. One of them can rotate and you can select anywhere from a slight darkening to an almost complete black.
It is very useful for the Moon and Planets (do not try it on the Sun!). Like all filters (except the solar one) it is fitted by screwing it to the back of an eyepiece or camera before inserting it. But this one requires a special inserting sequence:
VARIABLE GREY FILTER. These are two polarised filters screwed together. One of them can rotate and you can select anywhere from a slight darkening to an almost complete black.
It is very useful for the Moon and Planets (do not try it on the Sun!). Like all filters (except the solar one) it is fitted by screwing it to the back of an eyepiece or camera before inserting it. But this one requires a special inserting sequence:
1) You rotate one of the two parts to achieve the darkness you wish.
2) You keep the two parts together while screwing the filter to the eyepiece.
3) You keep the two parts together while inserting eyepiece-with-filter into the diagonal
4) Since the two parts are not perfectly aligned, you should insert—and later remove—the filter slowly and
carefully so that it does not get stuck inside the diagonal.
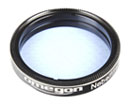 NEBULA/CITY LIGHT FILTER. The one by Omegon is favourably reviewed and affordable at €32. [Other filters are possibly even better for deep space objects and for specific city lights, but are mostly prohibitively expensive.] I have found it useful also when watching Mars.
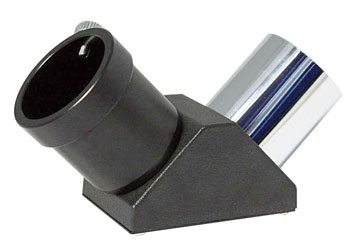
STANDARD 90º DIAGONAL. Watching with eyepieces inserted directly into the telescope requires leaning the head backwards, not too comfortable. Furthermore, with a Maksutov telescope the image is reversed upside-down. When you insert a “diagonal“ (which is just a mirror at a 45º angle) the image is fixed up-down, although it is still mirror-reversed left-right! Needless to say, this is irrelevant for sky objects, which have no “correct” North-South (up-down) or East-West (left-right) orientation anyway: the diagonal is just meant for comfort. The Skywatcher Diagonal mirror provided with this telescope (cost €40 if purchased separately) does not appear to be of top quality: within a few weeks I found that its plastic mirror—installed inside a plastic casing—gets easily soiled and scratched, that its reflectivity is not up to par, that the sockets for the screws (which hold the eyepieces in place) get easily worn and need fixing, and finally—and surprisingly—that it produces a measurable reduction in the sharpness of the image! Now I undestood why some webpages recommend upgrading the 90º Diagonal as a top priority.
 Good-quality 90º diagonals start in the region of €100: for a few bucks more I got the Orion Twist-Tight Dielectric Mirror Star Diagonal, an aluminium piece that holds the eyepiece with a rotating clamp: “look Ma, no screws!”. I was also surprised when I tested this diagonal and the Skywatcher one under identical controlled conditions with my 9mm Explore Scientific Ar eyepiece. The Skywatcher diagonal yielded a resolution of 1.21 arc" and the Orion 1.03 arc". This means that the Skywatcher diagonal had reduced the telescope's resolution by an appalling 15%. [Please note that this Orion Diagonal weighs 214g and its internal light trajectory is almost 1in. longer.
It will work fine on the SkyMax-102, but it may be too heavy for smaller telescopes, and too long for other models].
Good-quality 90º diagonals start in the region of €100: for a few bucks more I got the Orion Twist-Tight Dielectric Mirror Star Diagonal, an aluminium piece that holds the eyepiece with a rotating clamp: “look Ma, no screws!”. I was also surprised when I tested this diagonal and the Skywatcher one under identical controlled conditions with my 9mm Explore Scientific Ar eyepiece. The Skywatcher diagonal yielded a resolution of 1.21 arc" and the Orion 1.03 arc". This means that the Skywatcher diagonal had reduced the telescope's resolution by an appalling 15%. [Please note that this Orion Diagonal weighs 214g and its internal light trajectory is almost 1in. longer.
It will work fine on the SkyMax-102, but it may be too heavy for smaller telescopes, and too long for other models].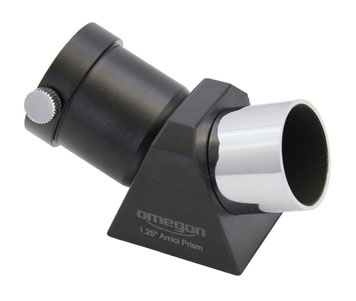
UPRIGHT 45º DIAGONAL. This type of unit contains a prism (often of the “Amici” type) that corrects all the telescope image reversals: it is an essential accessory (instead of the standard diagonal) when using the telescope for nature and landscape observation and photography. It is less useful for star watching, especially with magnifications higher than 100x, when the reflections inside the prism are likely to introduce optical aberrations. I got the Omegon Amici prism 45° at €50. Sharpness test showed a reduction in telescope resolution by a modest yet significant 17%. Therefore this is not a diagonal to be used for astronomical observation and photography.
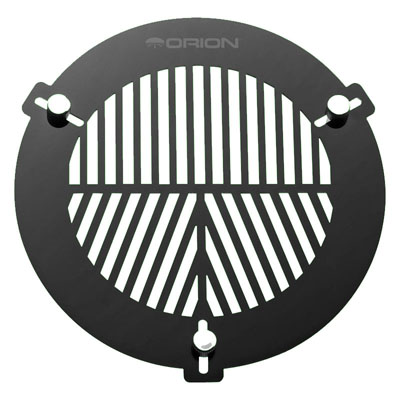 FOCUSING MASK. Focusing the SkyMax-102 is easy when watching at the Moon with its sharply-defined craters, but focusing planets is much less easier. One of the weak points of this telescope is the focusing knob, designed to cater for large differences in diagonals and eyepieces, not for the utmost focusing accuracy. A Focusing Mask is handy: you insert it into the telescope's large opening, you then just look through the telescope at any bright star (not a planet) and you try to focus it: the mask produces an “X” shape with a bar “|”. As you turn the focusing knob around, the bar moves: when it is exactly in the middle of the “X” , the focus is correct. Now you remove the mask and, as long as you do not disturb either the diagonal or the eyepiece, the image will be correctly focused when you look at any other sky object. Masks usually have screws to adjust them to different tube dimensions. Be careful however because, some masks are sold as “from 72-110mm up” when actually this is their external diameter and they will not fit anything much larger than 80mm say.
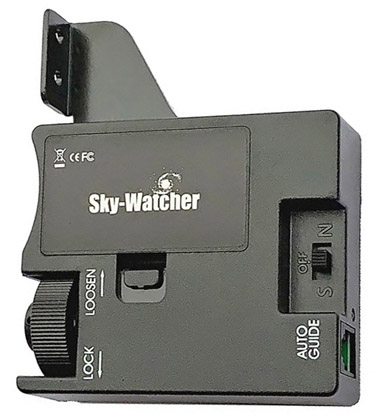
MOTOR DRIVE. The SkyWatcher AZ-EQ Avant/StarQuest Motor Drive, powered by two AA-batteries, is lightweight and simple to install. It is also very easy to operate: once you have pointed at your sky object, you “LOCK” the drive, start it and—presto!—for some minutes the mount strictly follows the Earth rotation, sparing you from manually using the RA knob. Using a motor drive has a further advantage: if you are looking at a difficult-to-find sky object and use high magnifications, the few seconds of distractions while you swap eyepieces may be enough for the object to fall outside your field of view, and it is then a chore to find it again. Not so if you have been running the motor drive while swapping eyepieces. This drive is available in Europe for €60, and it works to a charm, with minimal fuss and reduced battery consumption. I have never felt the necessity of uninstalling this drive either.
Tip 1: At first switching between “knob loose and drive off” and “knob locked and drive on” is tricky until you get the “feeling” of the knob: too tight and you cannot disangage without shaking the telescope, too loose and the drive will not perform accurately. In my experience after a minimum of practice it all becomes second nature.
Tip 2: If you are in the Northern Hemisphere, when switching the motor off, you may inadvertently move the switch too far and engage the “S” (Southern) position [or viceversa if you live in the Southern Hemisphere]. This problem is easy to prevent by gluing inside the switch groove a small piece of plastic accurately cut so that there are only two possible positions: “N” and "OFF” [or else “S” and "OFF” if you live in the Southern Hemisphere]
Note: The “AUDIO GUIDE” socket allows to connect a DSLR camera whereby you can fine-control the rotation speed so that the sky object stays in view. However, even without any such AUDIO GUIDE plugged in, an independent tester has shown how this drive keeps sky objects perfectly still for at least five minutes.
ASTROPHOTOGRAPHY ACCESSORIES. Lacking the possibility of a sturdy and high-precision electric drive, with this telescope it is hard to take long-exposure pictures, and expensive digital cameras are pointless. Luckily the recent and relatively affordable sensor cameras mount directly onto the telescope and connect via USB to a laptop where you watch the telescope image onscreen. Alternatively, you can get a smartphone adapter—to hold it steady—and take pictures through eyepieces. Please find more details in our Astrophotography webpage.