Asus T100TA - Replacing the keyboard and other tips
by Joe Claudio Di Veroli (formerly technical director of Seattle PC Service), Bray, Rep. Ireland, July 2014 and March 2017.
email address: ![]() (this is a picture to avoid spam: you have to type the email address in your message)
(this is a picture to avoid spam: you have to type the email address in your message)
Rubber feet are useless when the laptop is open
As observed by a reviewer, this otherwise excellent tablet+laptop (see pictures below) has a rather silly design fault:
"Underneath the keyboard are four rubber feet that keep the T100 in place on your table. Well they do when you're not using it.
Flip open the lid and the hinge lifts the keyboard up slightly, clearing the back feet. Because the hinge has no feet of its own,
the T100 got a whole lot more slidy". It is quite obvious that two front rubber feet are not enough to keep the T100 in place while you type.
SOLUTION: find out two small pieces of black rubber sheet, very slightly over 1mm thick, and cut two pieces measuring 7x15 mm.
Using Loctite or a similar product, glue them to the hinge against the plastic protruding bits.
I assume no responsibility for this suggestion: in my T100 it was simple, it worked to a charm and is long lasting.
Tip: If the rubber has a smooth side and a rough side, glue the smooth side against the T100.
Have the HDD and use it properly
If you are happy with the Asus T100 as a Windows "tablet" and occasional keyboard use, fine.
Otherwise, you better have the very slightly heavier (about 150g) and thicker (a few mm) models DK007H/P that include
a SATA 500G HDD in the "dock", below the keyboard. The SATA circuitry is cleverly derived from the USB3 chip,
allowing a hot removal and insert of the dock with its HDD and keyboard.
At this point, some tips are obvious, others perhaps less so:
Tip 1: BOOT. Refrain from installing in the HDD any drivers or utilities that are need during the boot process:
if the tablet is "undocked", they will not run and even the whole boot process could end badly.Tip 2: SAVING SSD SPACE. If you have a so-called 64G SSD model, the real partition size of drive C: is 49G, of which the installed Windows,
drivers and MS Office will leave only about 32G free. This will soon be not enough as you fill this space with fast games or personal files.
Obviously, you need a method to move some of the original folders into the HDD: see Tip 3 below.Tip 3: JUNCTIONS. If you are NOT using the tablet for some programs or files installed in the SSD (drive C:),
you can produce a "junction" and save SSD space.
A junction lets you move a folder to another driver while Windows believes it is still in the original place.
You download and copy the file junction.exe from here into C:\Windows, then if you wish to move, say, a folder
C:\Users\Mungo into the HDD in a folder D:\Users , you just
(a) move the folder Mungo from C:\Users into D:\Users,
(b) back in C:\Users (where Mungo should no longer exist) you open a command box and issue the following command:
junction "C:\Users\Mungo" "D:\Users\Mungo". This will create something that looks like a link but is actually a junction.
(c) If you click on it, you will see the folders and files inside D:\Users\Mungo, although they are reported to be in C:\Users\Mungo,
and so will Windows believe when searching for them.Tip 4: MOVING PROGRAMS. For example, the T100 comes with Microsoft Office 2013 Home and Student installed in the SSD.
If you will only read or process Office files (such as Word documents, Excel spreadsheets or PowerPoint presentations)
when the tablet is attached to the keyboard, then you can use a junction to move
C:\Program Files\Microsoft Office 15" into any partition in the HDD drive, thus leaving an additional free 2.4G in the SSD.
You can do the same with any large-size game you installed initially in the SSD and then decide it will not be used with the tablet alone:
this way you can free considerable space in the SSD for new applications or files that are to be used with the tablet alone.Tip 5: DOCUMENTS. I have subdivided my documents neatly in two groups: only a few are needed for my tablet-only use
(on a bus or train mainly for entertainment). I have placed the others in a D:\Docs folder in the HDD.Tip 6: PROGRAMS TO MOVE. Typical programs and utilities that you DO need on the tablet: Windows, drivers, Antivirus.
Typical ones you DO NOT need on the tablet, and can safely install in (or move/junction to) the HDD:
Backup (to external drive), Disk Defragmenting (HDD only), Webpage editing, Picture editing, Home accounting, Malwarebytes.Tip 7: PARTITIONS. You get the T100 with the HDD empty, accesible as drive D: . However,
before even copying a single file or installing anything into it, you should repartition the unit in two drives D: and E: .
In D: you store personal documents (I have it set to 50G) that may be important and require periodical backup to an external USB drive.
Partition E: takes the remaining 450G where you will store everything you do not need to back up:
if something gets accidentally deleted or corrupted, you just re-download and/or re-install it.
Typical examples are games that take a large disk space and/or require using the dock's keyboard, also large-size movies and songs.Tip 8: REPLACE THE HDD WITH AN SSD: Although the T100 comes with a particularly fast HDD, replacing it with a standard
SATA SSD will show a significant performance improvement. A further advantage is that, with no moving parts,
the T100 becomes more rugged against accidents.
Replacing the HDD
Just follow the directions below for replacing the Keyboard, just stop at Fig. E: the HDD is veryeasy to replace.
Replacing either the Keyboard or the Bracket
This laptop, that doubles as a Windows tablet, had very good reviews and was a best seller in 2014-2015. It is flexible, powerful and affordable.
The tablet has a SSD (max. 64G) and converts to a laptop by connecting it "live" to a dock that includes USB3, touchpad and mechanical keyboard.
We expect that a laptop by a leading maker will be delivered in every country with a localised keyboard. Unfortunately, this is often not the case.
Actually, an eminently useful variant of this product is the model that includes in the dock a HDD (usually 500G). Problem is, in 2014-2015,
at least in Europe, this variant was only sold by German firms with a German keyboard, even when sold in another countries.
The German keyboard swaps Y and Z and also includes characters that are neither familiar nor useful to non-German speakers.
A practical solution—which I adopted initially—is to CHANGE KEYBOARD LANGUAGE in Windows, and convert the keyboard
by gluing adhesive pieces of paper, painstakingly produced in a text editor and printed into self-adhesive labels, as shown in Fig. A.

Admittedly, though, this solution requires some hard work, is not very elegant and, most importantly, the labels will not last much.
A better alternative was suggested to the author over the phone by Asus support: it is possible to order here
a replacement keyboard in any language. This is a better looking, better feeling and long-term solution. See Fig. B.
Fig. B - The Asus T100TA Spanish replacement keyboard, supplied as a spare.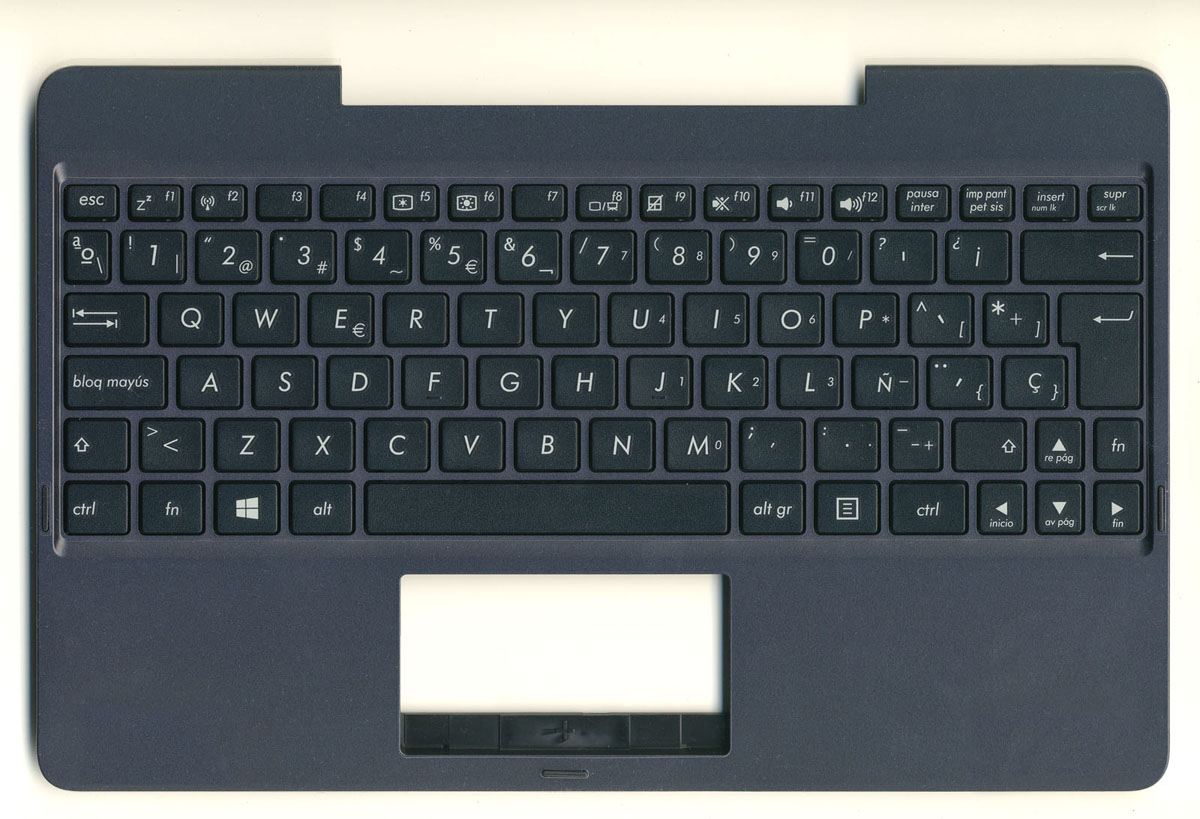
Then you need a technician to swap keyboards. In Ireland I failed to find anybody for this operation,
and being reasonably experienced with PC repairs, I decided to do the deed myself.
I also failed to find online directions for this operation. Eventually, this proved not to be excessively difficult.
The following instructions do not require any specialised PC knowledge, just to be reasonably skilled with common hand tools.
First of all, this replacement is far from being a simple operation (such as the one I performed years ago on an Asus Eee,
consisting of replacing the keyboard without opening the case). This is because in the Asus T100TA—unlike the Asus Eee—
the T100's keyboard is built into the dock's upper cover, and the internals of the dock are assembled onto the keyboard.
In other words, replacing the keybord means to disassemble most pieces inside the dock.
A similar disassembly is needed to replace the "bracket" (the complex hinge that joins the keyboard-base to the tablet).
To begin with, you should discharge your body of any static electricity, e.g. by touching back metal parts of a PC or
else metal pipes of a heating radiator. Do this every 30 minutes or so during the whole operation.
Find full disassembly directions below. If you are not familiar with laptops and work carefully, you may need up to 2 hours.
To begin with, disconnect the tablet and store it away: you will work only on the dock.
Fig. C - The T100 tablet and dock disconnected.

1. Place the dock with the keyboard looking down over a protective surface, for example a sheet of paper over a table.
You will see four rubber squares: you need to remove the two ones near to the hinged latch. Use a blunt or wooden screwdriver.
These pads are glued with double-sided adhesive tape: if you are careful the tape will stay glued to the pad and you do not reed to replace it.
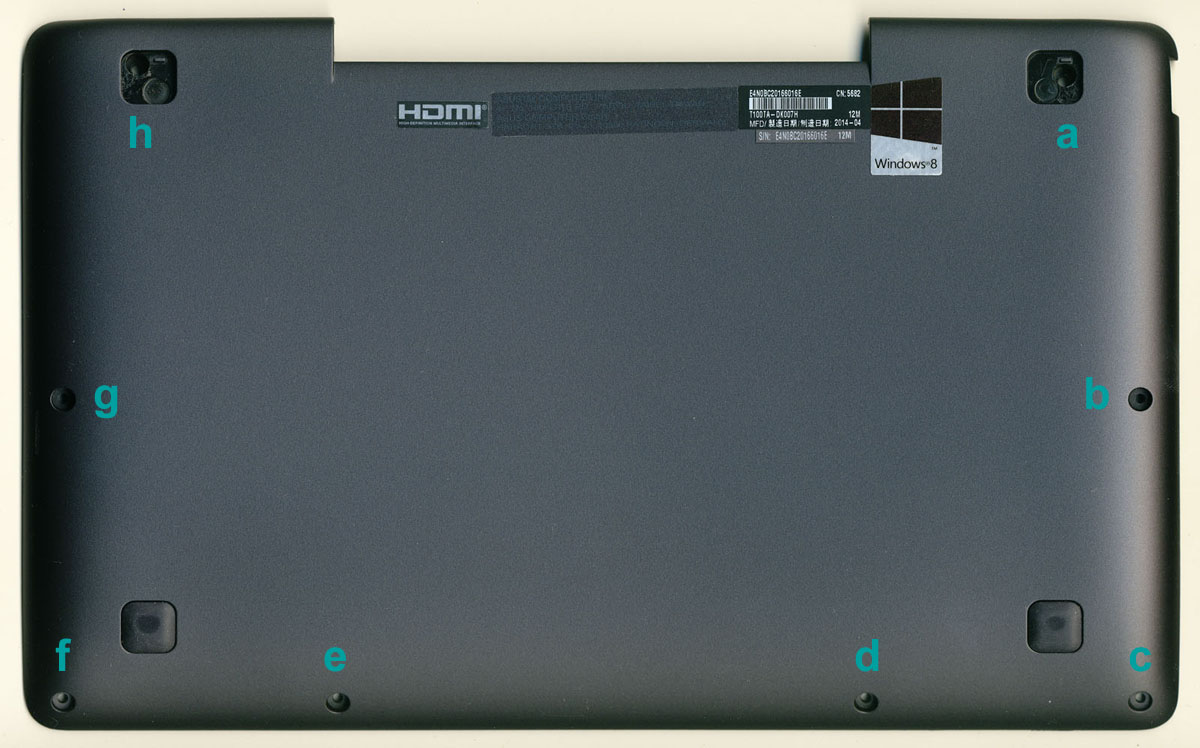
2. Removing these pads shows two 5mm-long screws (marked h and a in the picture below).
A further six 3mm-long screws (b to g in the picture below) are visible around the rim.
With a Philips No.1 screwdriver remove these 8 screws. Store the two types separately in small appropriately labelled boxes.
(I used a Nespresso 6x6 box and was thus able to label and store separately every single screw, as shown in a picture further below).
Fig. D - The base of the dock with all the eight screws removed.
3. Removing the screws does not remove the base. Not yet. You have to snap it away from the keyboard.
Start on a corner, using your nails, and proceed with a blunt tool such as a letter-opener,
sliding it all around the border until the base detaches from the keyboard.
Do it gradually and there will be no risk, as the base is a flexible piece of plastic..
Remove the base and store it for the final re-assembly operation.
You will now see (Fig. E) the dock's internals, all of them screwed onto the keyboard.
(This is your final stage if you wish to replace the HDD.)
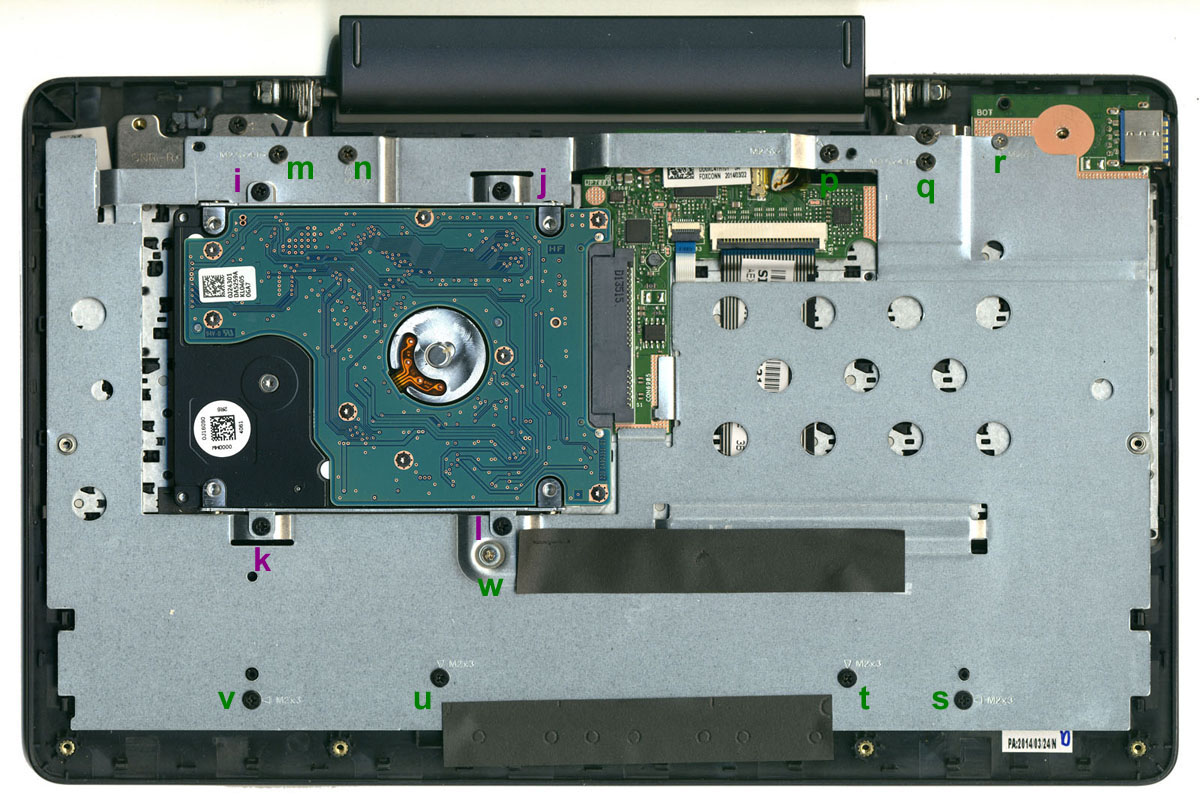
Fig. E - The internals of the dock with the HDD.
4. Carefully unglue the two black adhesive rubber strips: you will put them in place again later on.
5. Now you need to remove the HDD assembly: just remove the four black screws ( i , j , k , l ) that hold it to the metal plate.
Then slide horizontally the HDD to the left to disconnect it from the SATA connector. Store away the HDD assembly.
6. Remove the large metal plate by removing (and carefully storing) the screws that hold it in place (m to w):
in the upper border (nearest to the hinged latch) there are 4 black screws ( m , n , p , q ) plus a smaller nickel-plated screw (r).
In the lower border there are a further 4 black screws ( s , t , u , v ) and finally
there is a nickel-plated screw (w) immediately below the HDD mortise.
Having removed—and carefully stored—the 10 screws, the metal plate will come away with no difficulty.
Now (Fig. F) we can see the touchpad, the circuitry for the USB3 and HDD, and the hinged latch assembly.
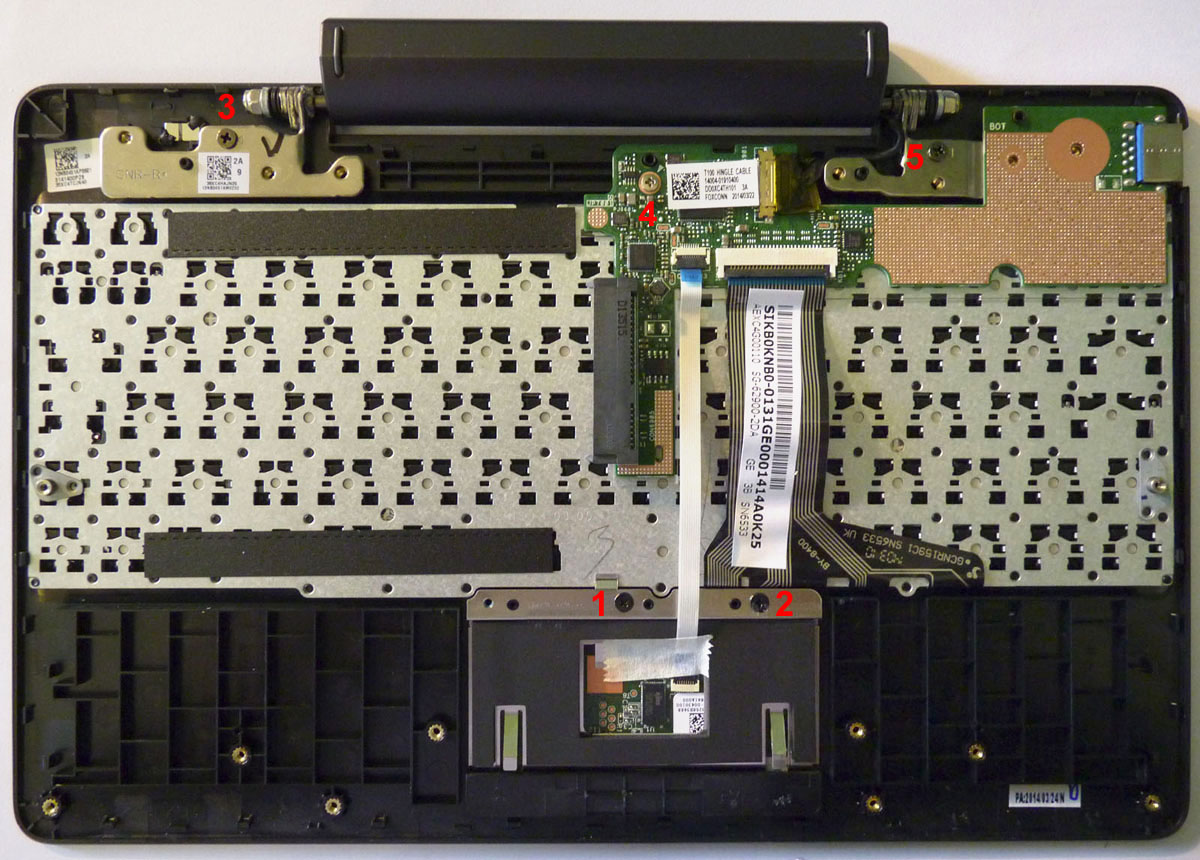
Fig. F - The dock with the HDD and the metal plate both removed.
Replacing the Keyboard
This is how you continue if your goal is to replace the keyboard.
If you need to replace the bracket, you will find different directions further below.
7. Before removing anything else you need to disconnect the two ribbon cables. Be careful with the fragile black retainers:
unlike many that disconnect by moving them away from the white base, these do not, and if you try hard you will seriously damage the T100!
You have to turn the black retainers around 90º (avoid a blunt tool such as a screwdrivers and just user a fingernail) until they are vertical.
Now you can disconnect both ribbon cables by pulling from their transparent-blue "handles".
8. The touchpad can now be removed by unscrewing the two screws ( 1 , 2 ) that hold it in place.
Your workplace should now look something like the picture below.
Fig. G - The workplace at this stage: notice the screw box with 6x6 cells and the printouts on the wall, with the screws numbered for a safe operation.

9. Things are a bit more difficult with the assembly consisting of the hinged latch and the HDD+USB3 circuitry:
they have to be removed together. Notice where the short black cable goes,
as you will have to put it back in the same position over the replacement keyboard.
First unscrew the two black hinge screws ( 3 , 5 in Fig. F above), then the circuitry nickel-plated screw ( 4 ) and finally remove this assembly.
10. You now have in front of you the original keyboard stripped of almost everything.
Put beside it the replacement keyboard as shown in Fig. G above:
you will notice that the latter does NOT include the two black horizontal strips.
Remove them from the original keyboard and press them firmly in place onto to the replacement keyboard.
11.
Also, the original keyboard has a transparent piece of plastic glued to it: remove it and affix it to the new keyboard.
12. You can now store away the original keyboard. On the new keyboard you can now add the hinged latch with the HDD+USB32 circuitry.
Be careful to place the black cable exactly in its special groove (although when the hinge is in use it will go out of it but this is no problem).
13.
Screw the two black hinge screws ( 3 , 5 ). These, as well as most screws that go into brass inlaid pieces,
should and can be adjusted quite hard without breaking anything. Up to a point, of course: if you apply excessive force you may break the screws!
Now place the circuitry carefully in place (aligning it with the small posts) and screw it in with its middle nickel-plated screw ( 4 ).
14. Insert the touchpad in place and fix it with its two screws ( 1 , 2 ) .
15. Connect the two ribbon cables and close down their black retainers.
The ribbons are a few millimetres too long, but this will not be an issue.
The procedure continues further below in the section entitled Reassembling .
Replacing the Bracket
The bracket has some small internal protrusions that may break after some use, producing unwanted lateral movements that eventually loosen internal screws.
As a consequence, the tablet rotates significantly back and forth, and the laptop does not keep closed when moved around.
The best solution to this annoying issue is to replacing the bracket assembly, which is an inexpensive (Euro 15) spare part, shown in Fig. H below.
Fig. H - The bracket assembly, both sides (photographs of my old part)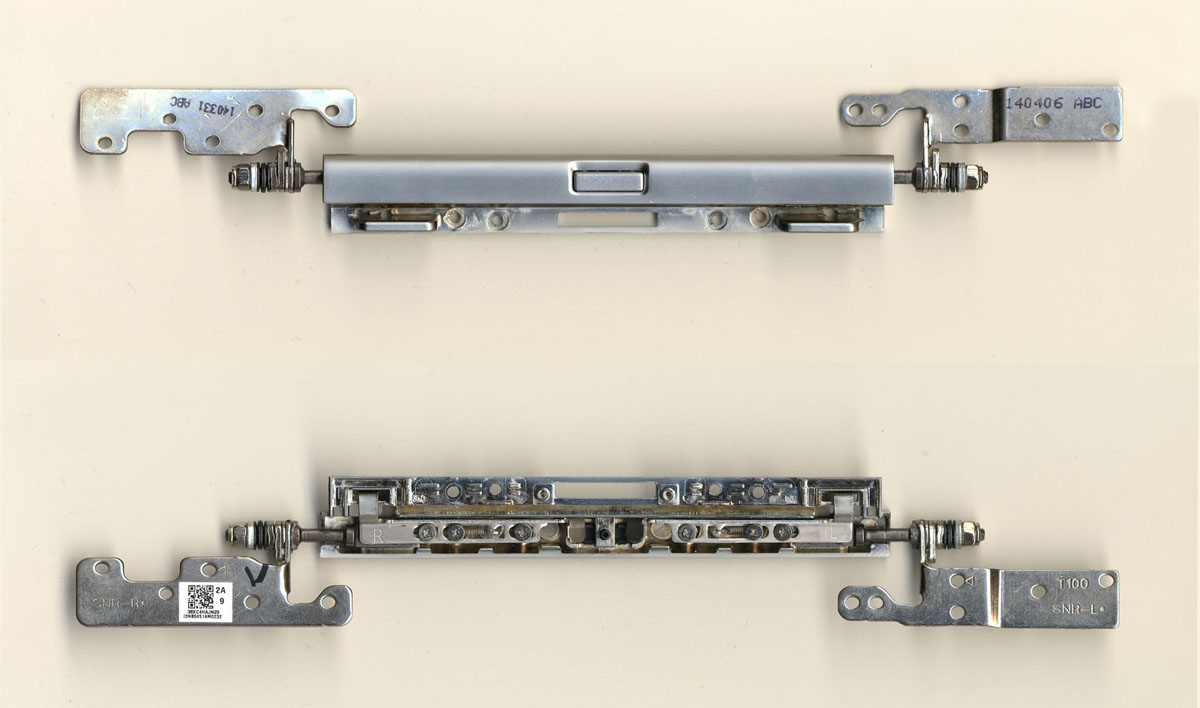
The directions below continue after Fig. F above.
7'. Inside the bracket there is a black adhesive lining. This has to be removed to access the 4 retaining screws. Do it carefully, because no spare is sold for this item. Alternatively, just cut and remove a 3mm-wide strip between the protruding supports: this is where, quite obviously, the screws are located.
8'. Remove the 4 screws and store them carefully.
9'. At this point the bracket's back (the external dark plastic part) is retained by just two protrusions and will come off by just inserting a knife in the corners.
Fig. I - The dock with HDD, metal plate and bracket back removed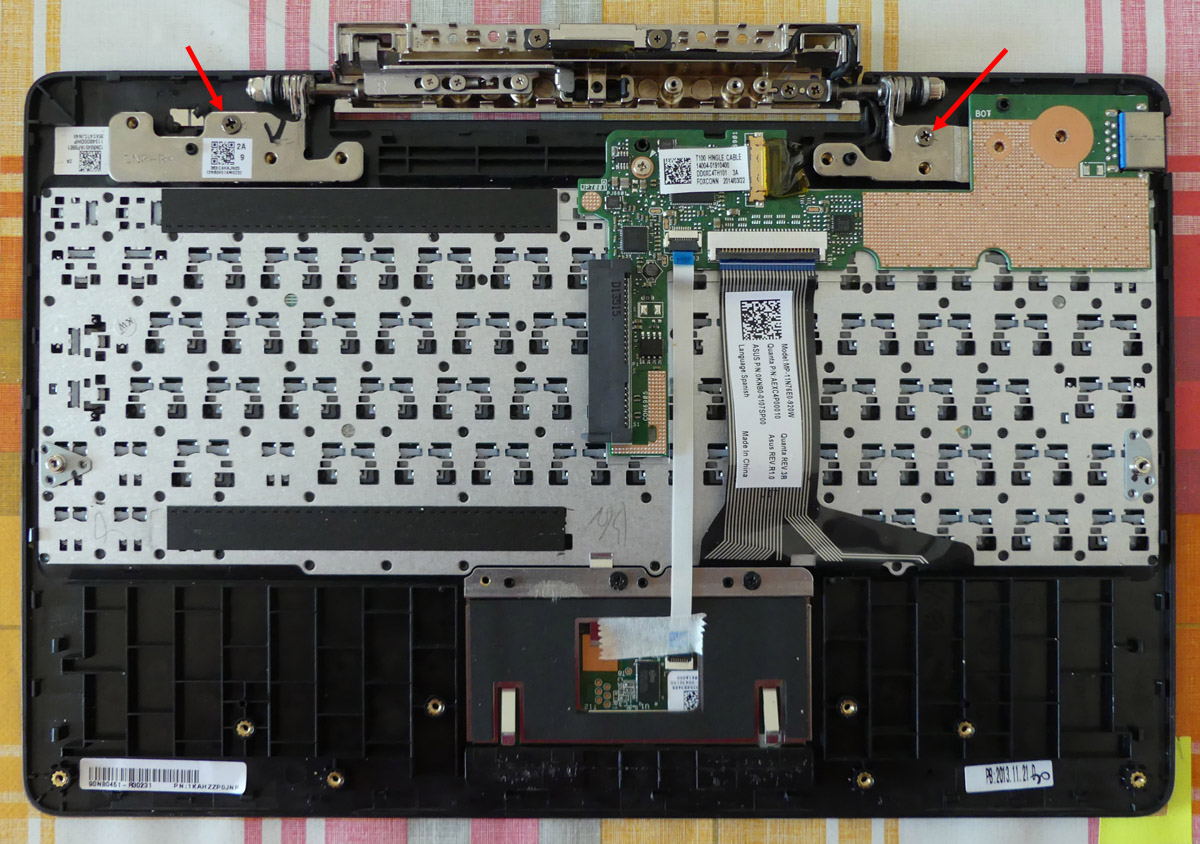
10'. Before removing the bracket assembly we need to remove from it the black connecting cable. This is very easy,
as this cable is just inserted inside grooves and its end has a "plug" with two easy-to-remove screws, as shown in Fig. J below.
Fig. J - Removing the cable from the bracket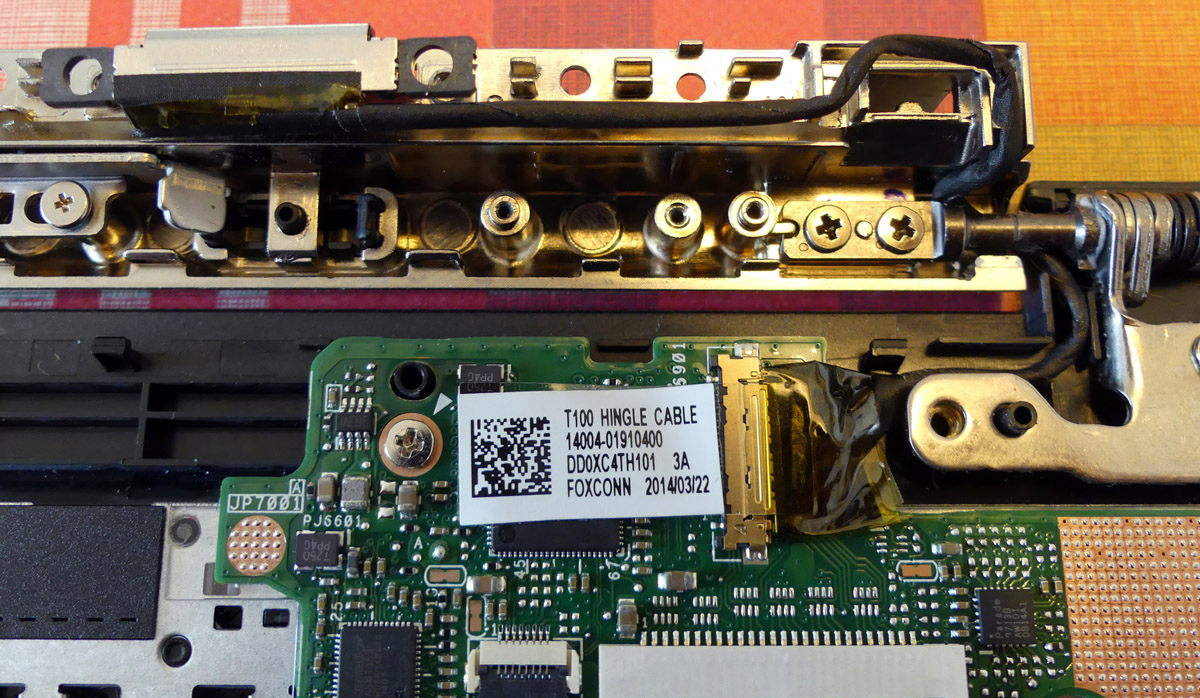
11'. At this point, by just removing two screws (shown with red arrows in Fig. I above) it is quite easy to fully remove the bracket assembly.
Fig. K - The base with the bracket fully removed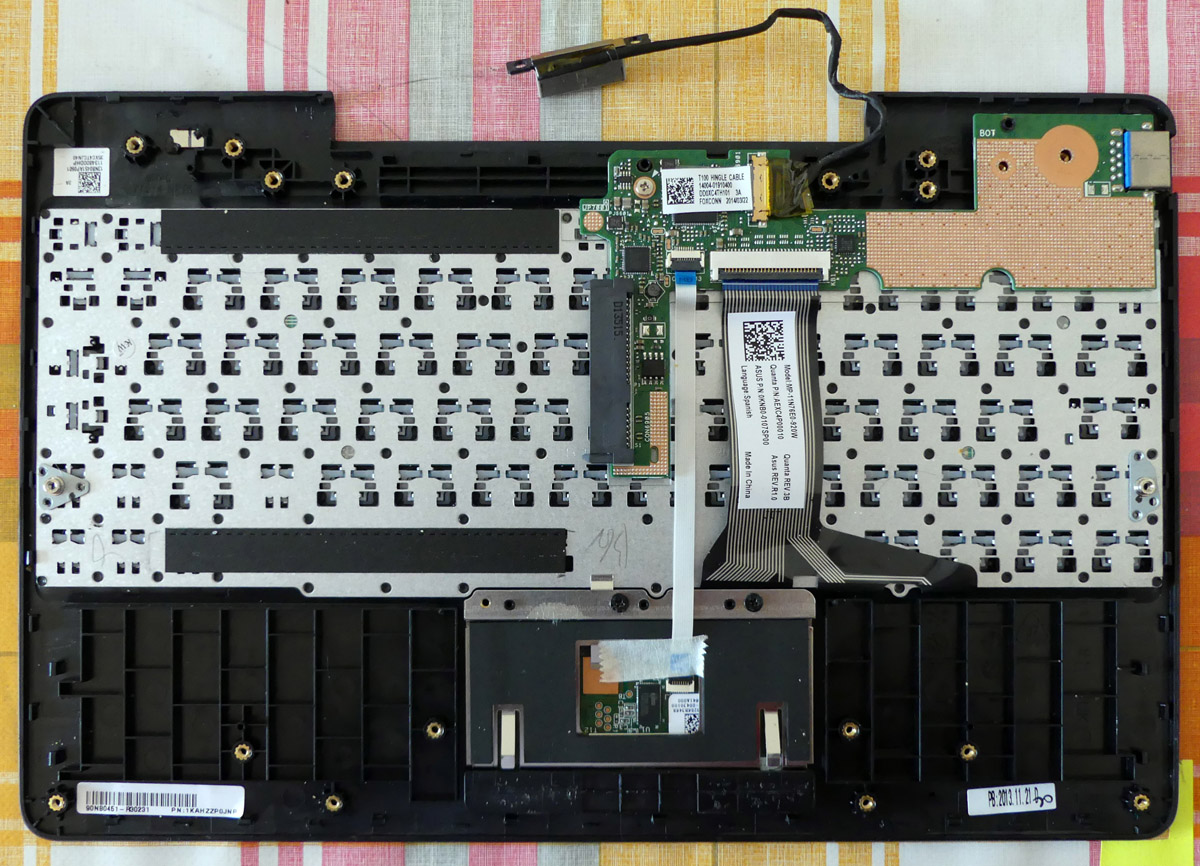
12'. Now you just redo the above procedure backwards: you install the new bracket assembly and secure it with its two screws,
you insert into it the cable and secure it with its two screws, you add the backet's back and secure it with its 4 screws
and finally you replace the internal lining (it will NOT be perfect, eventually use double-sided adhesive tape to improve, sorry!).
Reassembling
16. Put in place the large metal plate: it will press slightly the ribbon cables,
and you should try to have the "excess" protruding from the upper "window" in the plate.
17. Carefully fit the 10 screws ( m to w in Fig. E above) that hold the metal plate in place: screw all of them loose first, then go around again tightening them quite hard.
18. Replace the two adhesive black rubber strips onto the metal plate.
19. Replace the HDD: plug it laterally against the SATA connections, then screw ( i , j , k , l in FIg. E) the HDD assembly back to the metal plate.
20. After a general inspection (ensure that the black hinge cable is properly inserted!) replace the dock cover, snapping it in place all around.
21. Insert the 8 dock cover screws (a to h in Fig. D above) and tighten them hard.
22. Replace the square rubber pads: press them hard in place.
There procedures may not be for the fainthearted, and are perhaps not very straightforward, but are certainly not particularly complex or risky.
~~~~~~~~~~~~~~~~~~~~~~~~